4347 lines
107 KiB
Markdown
4347 lines
107 KiB
Markdown
# Notifications
|
||
|
||
* Introduction
|
||
* Generating Notifications
|
||
* Sending Notifications
|
||
* Using the Notifiable Trait
|
||
* Using the Notification Facade
|
||
* Specifying Delivery Channels
|
||
* Queueing Notifications
|
||
* On-Demand Notifications
|
||
* Mail Notifications
|
||
* Formatting Mail Messages
|
||
* Customizing the Sender
|
||
* Customizing the Recipient
|
||
* Customizing the Subject
|
||
* Customizing the Mailer
|
||
* Customizing the Templates
|
||
* Attachments
|
||
* Adding Tags and Metadata
|
||
* Customizing the Symfony Message
|
||
* Using Mailables
|
||
* Previewing Mail Notifications
|
||
* Markdown Mail Notifications
|
||
* Generating the Message
|
||
* Writing the Message
|
||
* Customizing the Components
|
||
* Database Notifications
|
||
* Prerequisites
|
||
* Formatting Database Notifications
|
||
* Accessing the Notifications
|
||
* Marking Notifications as Read
|
||
* Broadcast Notifications
|
||
* Prerequisites
|
||
* Formatting Broadcast Notifications
|
||
* Listening for Notifications
|
||
* SMS Notifications
|
||
* Prerequisites
|
||
* Formatting SMS Notifications
|
||
* Customizing the "From" Number
|
||
* Adding a Client Reference
|
||
* Routing SMS Notifications
|
||
* Slack Notifications
|
||
* Prerequisites
|
||
* Formatting Slack Notifications
|
||
* Slack Interactivity
|
||
* Routing Slack Notifications
|
||
* Notifying External Slack Workspaces
|
||
* Localizing Notifications
|
||
* Testing
|
||
* Notification Events
|
||
* Custom Channels
|
||
|
||
## Introduction
|
||
|
||
In addition to support for [sending email](/docs/12.x/mail), Laravel provides
|
||
support for sending notifications across a variety of delivery channels,
|
||
including email, SMS (via [Vonage](https://www.vonage.com/communications-
|
||
apis/), formerly known as Nexmo), and [Slack](https://slack.com). In addition,
|
||
a variety of [community built notification channels](https://laravel-
|
||
notification-channels.com/about/#suggesting-a-new-channel) have been created
|
||
to send notifications over dozens of different channels! Notifications may
|
||
also be stored in a database so they may be displayed in your web interface.
|
||
|
||
Typically, notifications should be short, informational messages that notify
|
||
users of something that occurred in your application. For example, if you are
|
||
writing a billing application, you might send an "Invoice Paid" notification
|
||
to your users via the email and SMS channels.
|
||
|
||
## Generating Notifications
|
||
|
||
In Laravel, each notification is represented by a single class that is
|
||
typically stored in the `app/Notifications` directory. Don't worry if you
|
||
don't see this directory in your application - it will be created for you when
|
||
you run the `make:notification` Artisan command:
|
||
|
||
|
||
|
||
1php artisan make:notification InvoicePaid
|
||
|
||
|
||
php artisan make:notification InvoicePaid
|
||
|
||
This command will place a fresh notification class in your `app/Notifications`
|
||
directory. Each notification class contains a `via` method and a variable
|
||
number of message building methods, such as `toMail` or `toDatabase`, that
|
||
convert the notification to a message tailored for that particular channel.
|
||
|
||
## Sending Notifications
|
||
|
||
### Using the Notifiable Trait
|
||
|
||
Notifications may be sent in two ways: using the `notify` method of the
|
||
`Notifiable` trait or using the `Notification` [facade](/docs/12.x/facades).
|
||
The `Notifiable` trait is included on your application's `App\Models\User`
|
||
model by default:
|
||
|
||
|
||
|
||
1<?php
|
||
|
||
2
|
||
|
||
3namespace App\Models;
|
||
|
||
4
|
||
|
||
5use Illuminate\Foundation\Auth\User as Authenticatable;
|
||
|
||
6use Illuminate\Notifications\Notifiable;
|
||
|
||
7
|
||
|
||
8class User extends Authenticatable
|
||
|
||
9{
|
||
|
||
10 use Notifiable;
|
||
|
||
11}
|
||
|
||
|
||
<?php
|
||
|
||
namespace App\Models;
|
||
|
||
use Illuminate\Foundation\Auth\User as Authenticatable;
|
||
use Illuminate\Notifications\Notifiable;
|
||
|
||
class User extends Authenticatable
|
||
{
|
||
use Notifiable;
|
||
}
|
||
|
||
The `notify` method that is provided by this trait expects to receive a
|
||
notification instance:
|
||
|
||
|
||
|
||
1use App\Notifications\InvoicePaid;
|
||
|
||
2
|
||
|
||
3$user->notify(new InvoicePaid($invoice));
|
||
|
||
|
||
use App\Notifications\InvoicePaid;
|
||
|
||
$user->notify(new InvoicePaid($invoice));
|
||
|
||
Remember, you may use the `Notifiable` trait on any of your models. You are
|
||
not limited to only including it on your `User` model.
|
||
|
||
### Using the Notification Facade
|
||
|
||
Alternatively, you may send notifications via the `Notification`
|
||
[facade](/docs/12.x/facades). This approach is useful when you need to send a
|
||
notification to multiple notifiable entities such as a collection of users. To
|
||
send notifications using the facade, pass all of the notifiable entities and
|
||
the notification instance to the `send` method:
|
||
|
||
|
||
|
||
1use Illuminate\Support\Facades\Notification;
|
||
|
||
2
|
||
|
||
3Notification::send($users, new InvoicePaid($invoice));
|
||
|
||
|
||
use Illuminate\Support\Facades\Notification;
|
||
|
||
Notification::send($users, new InvoicePaid($invoice));
|
||
|
||
You can also send notifications immediately using the `sendNow` method. This
|
||
method will send the notification immediately even if the notification
|
||
implements the `ShouldQueue` interface:
|
||
|
||
|
||
|
||
1Notification::sendNow($developers, new DeploymentCompleted($deployment));
|
||
|
||
|
||
Notification::sendNow($developers, new DeploymentCompleted($deployment));
|
||
|
||
### Specifying Delivery Channels
|
||
|
||
Every notification class has a `via` method that determines on which channels
|
||
the notification will be delivered. Notifications may be sent on the `mail`,
|
||
`database`, `broadcast`, `vonage`, and `slack` channels.
|
||
|
||
If you would like to use other delivery channels such as Telegram or Pusher,
|
||
check out the community driven [Laravel Notification Channels
|
||
website](http://laravel-notification-channels.com).
|
||
|
||
The `via` method receives a `$notifiable` instance, which will be an instance
|
||
of the class to which the notification is being sent. You may use
|
||
`$notifiable` to determine which channels the notification should be delivered
|
||
on:
|
||
|
||
|
||
|
||
1/**
|
||
|
||
2 * Get the notification's delivery channels.
|
||
|
||
3 *
|
||
|
||
4 * @return array<int, string>
|
||
|
||
5 */
|
||
|
||
6public function via(object $notifiable): array
|
||
|
||
7{
|
||
|
||
8 return $notifiable->prefers_sms ? ['vonage'] : ['mail', 'database'];
|
||
|
||
9}
|
||
|
||
|
||
/**
|
||
* Get the notification's delivery channels.
|
||
*
|
||
* @return array<int, string>
|
||
*/
|
||
public function via(object $notifiable): array
|
||
{
|
||
return $notifiable->prefers_sms ? ['vonage'] : ['mail', 'database'];
|
||
}
|
||
|
||
### Queueing Notifications
|
||
|
||
Before queueing notifications, you should configure your queue and [start a
|
||
worker](/docs/12.x/queues#running-the-queue-worker).
|
||
|
||
Sending notifications can take time, especially if the channel needs to make
|
||
an external API call to deliver the notification. To speed up your
|
||
application's response time, let your notification be queued by adding the
|
||
`ShouldQueue` interface and `Queueable` trait to your class. The interface and
|
||
trait are already imported for all notifications generated using the
|
||
`make:notification` command, so you may immediately add them to your
|
||
notification class:
|
||
|
||
|
||
|
||
1<?php
|
||
|
||
2
|
||
|
||
3namespace App\Notifications;
|
||
|
||
4
|
||
|
||
5use Illuminate\Bus\Queueable;
|
||
|
||
6use Illuminate\Contracts\Queue\ShouldQueue;
|
||
|
||
7use Illuminate\Notifications\Notification;
|
||
|
||
8
|
||
|
||
9class InvoicePaid extends Notification implements ShouldQueue
|
||
|
||
10{
|
||
|
||
11 use Queueable;
|
||
|
||
12
|
||
|
||
13 // ...
|
||
|
||
14}
|
||
|
||
|
||
<?php
|
||
|
||
namespace App\Notifications;
|
||
|
||
use Illuminate\Bus\Queueable;
|
||
use Illuminate\Contracts\Queue\ShouldQueue;
|
||
use Illuminate\Notifications\Notification;
|
||
|
||
class InvoicePaid extends Notification implements ShouldQueue
|
||
{
|
||
use Queueable;
|
||
|
||
// ...
|
||
}
|
||
|
||
Once the `ShouldQueue` interface has been added to your notification, you may
|
||
send the notification like normal. Laravel will detect the `ShouldQueue`
|
||
interface on the class and automatically queue the delivery of the
|
||
notification:
|
||
|
||
|
||
|
||
1$user->notify(new InvoicePaid($invoice));
|
||
|
||
|
||
$user->notify(new InvoicePaid($invoice));
|
||
|
||
When queueing notifications, a queued job will be created for each recipient
|
||
and channel combination. For example, six jobs will be dispatched to the queue
|
||
if your notification has three recipients and two channels.
|
||
|
||
#### Delaying Notifications
|
||
|
||
If you would like to delay the delivery of the notification, you may chain the
|
||
`delay` method onto your notification instantiation:
|
||
|
||
|
||
|
||
1$delay = now()->addMinutes(10);
|
||
|
||
2
|
||
|
||
3$user->notify((new InvoicePaid($invoice))->delay($delay));
|
||
|
||
|
||
$delay = now()->addMinutes(10);
|
||
|
||
$user->notify((new InvoicePaid($invoice))->delay($delay));
|
||
|
||
You may pass an array to the `delay` method to specify the delay amount for
|
||
specific channels:
|
||
|
||
|
||
|
||
1$user->notify((new InvoicePaid($invoice))->delay([
|
||
|
||
2 'mail' => now()->addMinutes(5),
|
||
|
||
3 'sms' => now()->addMinutes(10),
|
||
|
||
4]));
|
||
|
||
|
||
$user->notify((new InvoicePaid($invoice))->delay([
|
||
'mail' => now()->addMinutes(5),
|
||
'sms' => now()->addMinutes(10),
|
||
]));
|
||
|
||
Alternatively, you may define a `withDelay` method on the notification class
|
||
itself. The `withDelay` method should return an array of channel names and
|
||
delay values:
|
||
|
||
|
||
|
||
1/**
|
||
|
||
2 * Determine the notification's delivery delay.
|
||
|
||
3 *
|
||
|
||
4 * @return array<string, \Illuminate\Support\Carbon>
|
||
|
||
5 */
|
||
|
||
6public function withDelay(object $notifiable): array
|
||
|
||
7{
|
||
|
||
8 return [
|
||
|
||
9 'mail' => now()->addMinutes(5),
|
||
|
||
10 'sms' => now()->addMinutes(10),
|
||
|
||
11 ];
|
||
|
||
12}
|
||
|
||
|
||
/**
|
||
* Determine the notification's delivery delay.
|
||
*
|
||
* @return array<string, \Illuminate\Support\Carbon>
|
||
*/
|
||
public function withDelay(object $notifiable): array
|
||
{
|
||
return [
|
||
'mail' => now()->addMinutes(5),
|
||
'sms' => now()->addMinutes(10),
|
||
];
|
||
}
|
||
|
||
#### Customizing the Notification Queue Connection
|
||
|
||
By default, queued notifications will be queued using your application's
|
||
default queue connection. If you would like to specify a different connection
|
||
that should be used for a particular notification, you may call the
|
||
`onConnection` method from your notification's constructor:
|
||
|
||
|
||
|
||
1<?php
|
||
|
||
2
|
||
|
||
3namespace App\Notifications;
|
||
|
||
4
|
||
|
||
5use Illuminate\Bus\Queueable;
|
||
|
||
6use Illuminate\Contracts\Queue\ShouldQueue;
|
||
|
||
7use Illuminate\Notifications\Notification;
|
||
|
||
8
|
||
|
||
9class InvoicePaid extends Notification implements ShouldQueue
|
||
|
||
10{
|
||
|
||
11 use Queueable;
|
||
|
||
12
|
||
|
||
13 /**
|
||
|
||
14 * Create a new notification instance.
|
||
|
||
15 */
|
||
|
||
16 public function __construct()
|
||
|
||
17 {
|
||
|
||
18 $this->onConnection('redis');
|
||
|
||
19 }
|
||
|
||
20}
|
||
|
||
|
||
<?php
|
||
|
||
namespace App\Notifications;
|
||
|
||
use Illuminate\Bus\Queueable;
|
||
use Illuminate\Contracts\Queue\ShouldQueue;
|
||
use Illuminate\Notifications\Notification;
|
||
|
||
class InvoicePaid extends Notification implements ShouldQueue
|
||
{
|
||
use Queueable;
|
||
|
||
/**
|
||
* Create a new notification instance.
|
||
*/
|
||
public function __construct()
|
||
{
|
||
$this->onConnection('redis');
|
||
}
|
||
}
|
||
|
||
Or, if you would like to specify a specific queue connection that should be
|
||
used for each notification channel supported by the notification, you may
|
||
define a `viaConnections` method on your notification. This method should
|
||
return an array of channel name / queue connection name pairs:
|
||
|
||
|
||
|
||
1/**
|
||
|
||
2 * Determine which connections should be used for each notification channel.
|
||
|
||
3 *
|
||
|
||
4 * @return array<string, string>
|
||
|
||
5 */
|
||
|
||
6public function viaConnections(): array
|
||
|
||
7{
|
||
|
||
8 return [
|
||
|
||
9 'mail' => 'redis',
|
||
|
||
10 'database' => 'sync',
|
||
|
||
11 ];
|
||
|
||
12}
|
||
|
||
|
||
/**
|
||
* Determine which connections should be used for each notification channel.
|
||
*
|
||
* @return array<string, string>
|
||
*/
|
||
public function viaConnections(): array
|
||
{
|
||
return [
|
||
'mail' => 'redis',
|
||
'database' => 'sync',
|
||
];
|
||
}
|
||
|
||
#### Customizing Notification Channel Queues
|
||
|
||
If you would like to specify a specific queue that should be used for each
|
||
notification channel supported by the notification, you may define a
|
||
`viaQueues` method on your notification. This method should return an array of
|
||
channel name / queue name pairs:
|
||
|
||
|
||
|
||
1/**
|
||
|
||
2 * Determine which queues should be used for each notification channel.
|
||
|
||
3 *
|
||
|
||
4 * @return array<string, string>
|
||
|
||
5 */
|
||
|
||
6public function viaQueues(): array
|
||
|
||
7{
|
||
|
||
8 return [
|
||
|
||
9 'mail' => 'mail-queue',
|
||
|
||
10 'slack' => 'slack-queue',
|
||
|
||
11 ];
|
||
|
||
12}
|
||
|
||
|
||
/**
|
||
* Determine which queues should be used for each notification channel.
|
||
*
|
||
* @return array<string, string>
|
||
*/
|
||
public function viaQueues(): array
|
||
{
|
||
return [
|
||
'mail' => 'mail-queue',
|
||
'slack' => 'slack-queue',
|
||
];
|
||
}
|
||
|
||
#### Queued Notification Middleware
|
||
|
||
Queued notifications may define middleware [just like queued
|
||
jobs](/docs/12.x/queues#job-middleware). To get started, define a `middleware`
|
||
method on your notification class. The `middleware` method will receive
|
||
`$notifiable` and `$channel` variables, which allow you to customize the
|
||
returned middleware based on the notification's destination:
|
||
|
||
|
||
|
||
1use Illuminate\Queue\Middleware\RateLimited;
|
||
|
||
2
|
||
|
||
3/**
|
||
|
||
4 * Get the middleware the notification job should pass through.
|
||
|
||
5 *
|
||
|
||
6 * @return array<int, object>
|
||
|
||
7 */
|
||
|
||
8public function middleware(object $notifiable, string $channel)
|
||
|
||
9{
|
||
|
||
10 return match ($channel) {
|
||
|
||
11 'mail' => [new RateLimited('postmark')],
|
||
|
||
12 'slack' => [new RateLimited('slack')],
|
||
|
||
13 default => [],
|
||
|
||
14 };
|
||
|
||
15}
|
||
|
||
|
||
use Illuminate\Queue\Middleware\RateLimited;
|
||
|
||
/**
|
||
* Get the middleware the notification job should pass through.
|
||
*
|
||
* @return array<int, object>
|
||
*/
|
||
public function middleware(object $notifiable, string $channel)
|
||
{
|
||
return match ($channel) {
|
||
'mail' => [new RateLimited('postmark')],
|
||
'slack' => [new RateLimited('slack')],
|
||
default => [],
|
||
};
|
||
}
|
||
|
||
#### Queued Notifications and Database Transactions
|
||
|
||
When queued notifications are dispatched within database transactions, they
|
||
may be processed by the queue before the database transaction has committed.
|
||
When this happens, any updates you have made to models or database records
|
||
during the database transaction may not yet be reflected in the database. In
|
||
addition, any models or database records created within the transaction may
|
||
not exist in the database. If your notification depends on these models,
|
||
unexpected errors can occur when the job that sends the queued notification is
|
||
processed.
|
||
|
||
If your queue connection's `after_commit` configuration option is set to
|
||
`false`, you may still indicate that a particular queued notification should
|
||
be dispatched after all open database transactions have been committed by
|
||
calling the `afterCommit` method when sending the notification:
|
||
|
||
|
||
|
||
1use App\Notifications\InvoicePaid;
|
||
|
||
2
|
||
|
||
3$user->notify((new InvoicePaid($invoice))->afterCommit());
|
||
|
||
|
||
use App\Notifications\InvoicePaid;
|
||
|
||
$user->notify((new InvoicePaid($invoice))->afterCommit());
|
||
|
||
Alternatively, you may call the `afterCommit` method from your notification's
|
||
constructor:
|
||
|
||
|
||
|
||
1<?php
|
||
|
||
2
|
||
|
||
3namespace App\Notifications;
|
||
|
||
4
|
||
|
||
5use Illuminate\Bus\Queueable;
|
||
|
||
6use Illuminate\Contracts\Queue\ShouldQueue;
|
||
|
||
7use Illuminate\Notifications\Notification;
|
||
|
||
8
|
||
|
||
9class InvoicePaid extends Notification implements ShouldQueue
|
||
|
||
10{
|
||
|
||
11 use Queueable;
|
||
|
||
12
|
||
|
||
13 /**
|
||
|
||
14 * Create a new notification instance.
|
||
|
||
15 */
|
||
|
||
16 public function __construct()
|
||
|
||
17 {
|
||
|
||
18 $this->afterCommit();
|
||
|
||
19 }
|
||
|
||
20}
|
||
|
||
|
||
<?php
|
||
|
||
namespace App\Notifications;
|
||
|
||
use Illuminate\Bus\Queueable;
|
||
use Illuminate\Contracts\Queue\ShouldQueue;
|
||
use Illuminate\Notifications\Notification;
|
||
|
||
class InvoicePaid extends Notification implements ShouldQueue
|
||
{
|
||
use Queueable;
|
||
|
||
/**
|
||
* Create a new notification instance.
|
||
*/
|
||
public function __construct()
|
||
{
|
||
$this->afterCommit();
|
||
}
|
||
}
|
||
|
||
To learn more about working around these issues, please review the
|
||
documentation regarding [queued jobs and database
|
||
transactions](/docs/12.x/queues#jobs-and-database-transactions).
|
||
|
||
#### Determining if a Queued Notification Should Be Sent
|
||
|
||
After a queued notification has been dispatched for the queue for background
|
||
processing, it will typically be accepted by a queue worker and sent to its
|
||
intended recipient.
|
||
|
||
However, if you would like to make the final determination on whether the
|
||
queued notification should be sent after it is being processed by a queue
|
||
worker, you may define a `shouldSend` method on the notification class. If
|
||
this method returns `false`, the notification will not be sent:
|
||
|
||
|
||
|
||
1/**
|
||
|
||
2 * Determine if the notification should be sent.
|
||
|
||
3 */
|
||
|
||
4public function shouldSend(object $notifiable, string $channel): bool
|
||
|
||
5{
|
||
|
||
6 return $this->invoice->isPaid();
|
||
|
||
7}
|
||
|
||
|
||
/**
|
||
* Determine if the notification should be sent.
|
||
*/
|
||
public function shouldSend(object $notifiable, string $channel): bool
|
||
{
|
||
return $this->invoice->isPaid();
|
||
}
|
||
|
||
### On-Demand Notifications
|
||
|
||
Sometimes you may need to send a notification to someone who is not stored as
|
||
a "user" of your application. Using the `Notification` facade's `route`
|
||
method, you may specify ad-hoc notification routing information before sending
|
||
the notification:
|
||
|
||
|
||
|
||
1use Illuminate\Broadcasting\Channel;
|
||
|
||
2use Illuminate\Support\Facades\Notification;
|
||
|
||
3
|
||
|
||
4Notification::route('mail', '[[email protected]](/cdn-cgi/l/email-protection)')
|
||
|
||
5 ->route('vonage', '5555555555')
|
||
|
||
6 ->route('slack', '#slack-channel')
|
||
|
||
7 ->route('broadcast', [new Channel('channel-name')])
|
||
|
||
8 ->notify(new InvoicePaid($invoice));
|
||
|
||
|
||
use Illuminate\Broadcasting\Channel;
|
||
use Illuminate\Support\Facades\Notification;
|
||
|
||
Notification::route('mail', '[[email protected]](/cdn-cgi/l/email-protection)')
|
||
->route('vonage', '5555555555')
|
||
->route('slack', '#slack-channel')
|
||
->route('broadcast', [new Channel('channel-name')])
|
||
->notify(new InvoicePaid($invoice));
|
||
|
||
If you would like to provide the recipient's name when sending an on-demand
|
||
notification to the `mail` route, you may provide an array that contains the
|
||
email address as the key and the name as the value of the first element in the
|
||
array:
|
||
|
||
|
||
|
||
1Notification::route('mail', [
|
||
|
||
2 '[[email protected]](/cdn-cgi/l/email-protection)' => 'Barrett Blair',
|
||
|
||
3])->notify(new InvoicePaid($invoice));
|
||
|
||
|
||
Notification::route('mail', [
|
||
'[[email protected]](/cdn-cgi/l/email-protection)' => 'Barrett Blair',
|
||
])->notify(new InvoicePaid($invoice));
|
||
|
||
Using the `routes` method, you may provide ad-hoc routing information for
|
||
multiple notification channels at once:
|
||
|
||
|
||
|
||
1Notification::routes([
|
||
|
||
2 'mail' => ['[[email protected]](/cdn-cgi/l/email-protection)' => 'Barrett Blair'],
|
||
|
||
3 'vonage' => '5555555555',
|
||
|
||
4])->notify(new InvoicePaid($invoice));
|
||
|
||
|
||
Notification::routes([
|
||
'mail' => ['[[email protected]](/cdn-cgi/l/email-protection)' => 'Barrett Blair'],
|
||
'vonage' => '5555555555',
|
||
])->notify(new InvoicePaid($invoice));
|
||
|
||
## Mail Notifications
|
||
|
||
### Formatting Mail Messages
|
||
|
||
If a notification supports being sent as an email, you should define a
|
||
`toMail` method on the notification class. This method will receive a
|
||
`$notifiable` entity and should return an
|
||
`Illuminate\Notifications\Messages\MailMessage` instance.
|
||
|
||
The `MailMessage` class contains a few simple methods to help you build
|
||
transactional email messages. Mail messages may contain lines of text as well
|
||
as a "call to action". Let's take a look at an example `toMail` method:
|
||
|
||
|
||
|
||
1/**
|
||
|
||
2 * Get the mail representation of the notification.
|
||
|
||
3 */
|
||
|
||
4public function toMail(object $notifiable): MailMessage
|
||
|
||
5{
|
||
|
||
6 $url = url('/invoice/'.$this->invoice->id);
|
||
|
||
7
|
||
|
||
8 return (new MailMessage)
|
||
|
||
9 ->greeting('Hello!')
|
||
|
||
10 ->line('One of your invoices has been paid!')
|
||
|
||
11 ->lineIf($this->amount > 0, "Amount paid: {$this->amount}")
|
||
|
||
12 ->action('View Invoice', $url)
|
||
|
||
13 ->line('Thank you for using our application!');
|
||
|
||
14}
|
||
|
||
|
||
/**
|
||
* Get the mail representation of the notification.
|
||
*/
|
||
public function toMail(object $notifiable): MailMessage
|
||
{
|
||
$url = url('/invoice/'.$this->invoice->id);
|
||
|
||
return (new MailMessage)
|
||
->greeting('Hello!')
|
||
->line('One of your invoices has been paid!')
|
||
->lineIf($this->amount > 0, "Amount paid: {$this->amount}")
|
||
->action('View Invoice', $url)
|
||
->line('Thank you for using our application!');
|
||
}
|
||
|
||
Note we are using `$this->invoice->id` in our `toMail` method. You may pass
|
||
any data your notification needs to generate its message into the
|
||
notification's constructor.
|
||
|
||
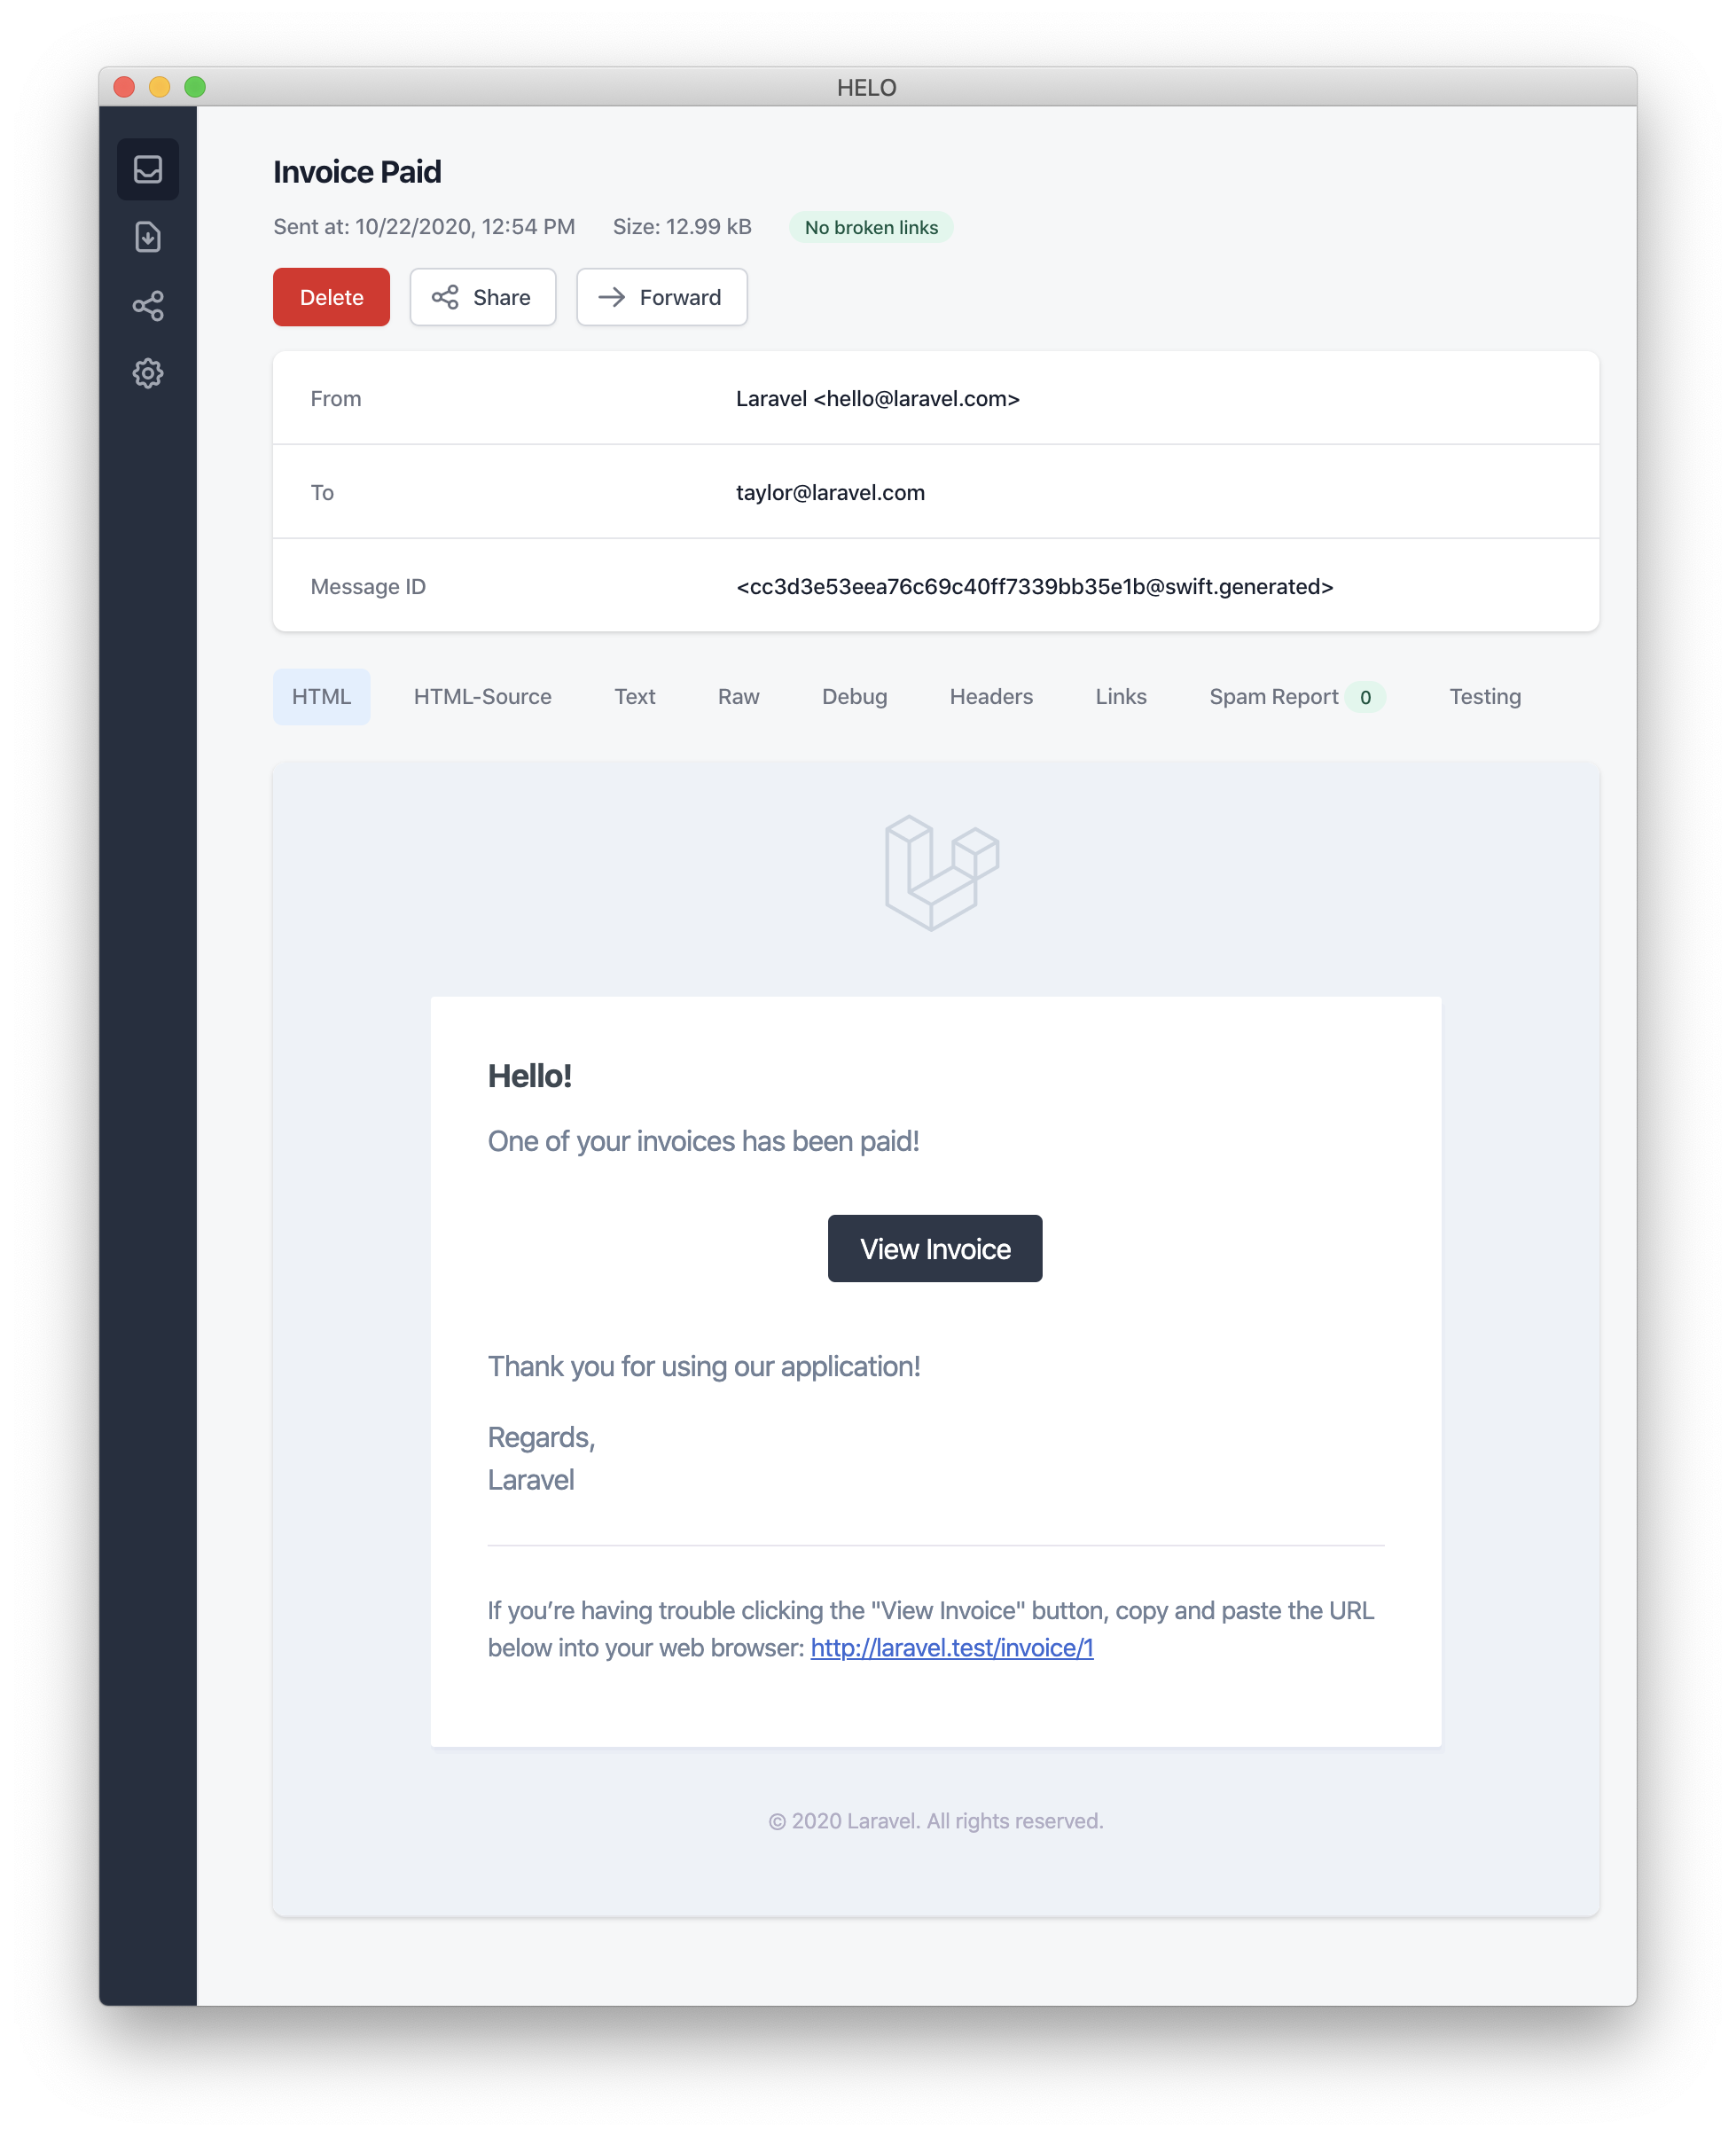
In this example, we register a greeting, a line of text, a call to action, and
|
||
then another line of text. These methods provided by the `MailMessage` object
|
||
make it simple and fast to format small transactional emails. The mail channel
|
||
will then translate the message components into a beautiful, responsive HTML
|
||
email template with a plain-text counterpart. Here is an example of an email
|
||
generated by the `mail` channel:
|
||
|
||
|
||
|
||
When sending mail notifications, be sure to set the `name` configuration
|
||
option in your `config/app.php` configuration file. This value will be used in
|
||
the header and footer of your mail notification messages.
|
||
|
||
#### Error Messages
|
||
|
||
Some notifications inform users of errors, such as a failed invoice payment.
|
||
You may indicate that a mail message is regarding an error by calling the
|
||
`error` method when building your message. When using the `error` method on a
|
||
mail message, the call to action button will be red instead of black:
|
||
|
||
|
||
|
||
1/**
|
||
|
||
2 * Get the mail representation of the notification.
|
||
|
||
3 */
|
||
|
||
4public function toMail(object $notifiable): MailMessage
|
||
|
||
5{
|
||
|
||
6 return (new MailMessage)
|
||
|
||
7 ->error()
|
||
|
||
8 ->subject('Invoice Payment Failed')
|
||
|
||
9 ->line('...');
|
||
|
||
10}
|
||
|
||
|
||
/**
|
||
* Get the mail representation of the notification.
|
||
*/
|
||
public function toMail(object $notifiable): MailMessage
|
||
{
|
||
return (new MailMessage)
|
||
->error()
|
||
->subject('Invoice Payment Failed')
|
||
->line('...');
|
||
}
|
||
|
||
#### Other Mail Notification Formatting Options
|
||
|
||
Instead of defining the "lines" of text in the notification class, you may use
|
||
the `view` method to specify a custom template that should be used to render
|
||
the notification email:
|
||
|
||
|
||
|
||
1/**
|
||
|
||
2 * Get the mail representation of the notification.
|
||
|
||
3 */
|
||
|
||
4public function toMail(object $notifiable): MailMessage
|
||
|
||
5{
|
||
|
||
6 return (new MailMessage)->view(
|
||
|
||
7 'mail.invoice.paid', ['invoice' => $this->invoice]
|
||
|
||
8 );
|
||
|
||
9}
|
||
|
||
|
||
/**
|
||
* Get the mail representation of the notification.
|
||
*/
|
||
public function toMail(object $notifiable): MailMessage
|
||
{
|
||
return (new MailMessage)->view(
|
||
'mail.invoice.paid', ['invoice' => $this->invoice]
|
||
);
|
||
}
|
||
|
||
You may specify a plain-text view for the mail message by passing the view
|
||
name as the second element of an array that is given to the `view` method:
|
||
|
||
|
||
|
||
1/**
|
||
|
||
2 * Get the mail representation of the notification.
|
||
|
||
3 */
|
||
|
||
4public function toMail(object $notifiable): MailMessage
|
||
|
||
5{
|
||
|
||
6 return (new MailMessage)->view(
|
||
|
||
7 ['mail.invoice.paid', 'mail.invoice.paid-text'],
|
||
|
||
8 ['invoice' => $this->invoice]
|
||
|
||
9 );
|
||
|
||
10}
|
||
|
||
|
||
/**
|
||
* Get the mail representation of the notification.
|
||
*/
|
||
public function toMail(object $notifiable): MailMessage
|
||
{
|
||
return (new MailMessage)->view(
|
||
['mail.invoice.paid', 'mail.invoice.paid-text'],
|
||
['invoice' => $this->invoice]
|
||
);
|
||
}
|
||
|
||
Or, if your message only has a plain-text view, you may utilize the `text`
|
||
method:
|
||
|
||
|
||
|
||
1/**
|
||
|
||
2 * Get the mail representation of the notification.
|
||
|
||
3 */
|
||
|
||
4public function toMail(object $notifiable): MailMessage
|
||
|
||
5{
|
||
|
||
6 return (new MailMessage)->text(
|
||
|
||
7 'mail.invoice.paid-text', ['invoice' => $this->invoice]
|
||
|
||
8 );
|
||
|
||
9}
|
||
|
||
|
||
/**
|
||
* Get the mail representation of the notification.
|
||
*/
|
||
public function toMail(object $notifiable): MailMessage
|
||
{
|
||
return (new MailMessage)->text(
|
||
'mail.invoice.paid-text', ['invoice' => $this->invoice]
|
||
);
|
||
}
|
||
|
||
### Customizing the Sender
|
||
|
||
By default, the email's sender / from address is defined in the
|
||
`config/mail.php` configuration file. However, you may specify the from
|
||
address for a specific notification using the `from` method:
|
||
|
||
|
||
|
||
1/**
|
||
|
||
2 * Get the mail representation of the notification.
|
||
|
||
3 */
|
||
|
||
4public function toMail(object $notifiable): MailMessage
|
||
|
||
5{
|
||
|
||
6 return (new MailMessage)
|
||
|
||
7 ->from('[[email protected]](/cdn-cgi/l/email-protection)', 'Barrett Blair')
|
||
|
||
8 ->line('...');
|
||
|
||
9}
|
||
|
||
|
||
/**
|
||
* Get the mail representation of the notification.
|
||
*/
|
||
public function toMail(object $notifiable): MailMessage
|
||
{
|
||
return (new MailMessage)
|
||
->from('[[email protected]](/cdn-cgi/l/email-protection)', 'Barrett Blair')
|
||
->line('...');
|
||
}
|
||
|
||
### Customizing the Recipient
|
||
|
||
When sending notifications via the `mail` channel, the notification system
|
||
will automatically look for an `email` property on your notifiable entity. You
|
||
may customize which email address is used to deliver the notification by
|
||
defining a `routeNotificationForMail` method on the notifiable entity:
|
||
|
||
|
||
|
||
1<?php
|
||
|
||
2
|
||
|
||
3namespace App\Models;
|
||
|
||
4
|
||
|
||
5use Illuminate\Foundation\Auth\User as Authenticatable;
|
||
|
||
6use Illuminate\Notifications\Notifiable;
|
||
|
||
7use Illuminate\Notifications\Notification;
|
||
|
||
8
|
||
|
||
9class User extends Authenticatable
|
||
|
||
10{
|
||
|
||
11 use Notifiable;
|
||
|
||
12
|
||
|
||
13 /**
|
||
|
||
14 * Route notifications for the mail channel.
|
||
|
||
15 *
|
||
|
||
16 * @return array<string, string>|string
|
||
|
||
17 */
|
||
|
||
18 public function routeNotificationForMail(Notification $notification): array|string
|
||
|
||
19 {
|
||
|
||
20 // Return email address only...
|
||
|
||
21 return $this->email_address;
|
||
|
||
22
|
||
|
||
23 // Return email address and name...
|
||
|
||
24 return [$this->email_address => $this->name];
|
||
|
||
25 }
|
||
|
||
26}
|
||
|
||
|
||
<?php
|
||
|
||
namespace App\Models;
|
||
|
||
use Illuminate\Foundation\Auth\User as Authenticatable;
|
||
use Illuminate\Notifications\Notifiable;
|
||
use Illuminate\Notifications\Notification;
|
||
|
||
class User extends Authenticatable
|
||
{
|
||
use Notifiable;
|
||
|
||
/**
|
||
* Route notifications for the mail channel.
|
||
*
|
||
* @return array<string, string>|string
|
||
*/
|
||
public function routeNotificationForMail(Notification $notification): array|string
|
||
{
|
||
// Return email address only...
|
||
return $this->email_address;
|
||
|
||
// Return email address and name...
|
||
return [$this->email_address => $this->name];
|
||
}
|
||
}
|
||
|
||
### Customizing the Subject
|
||
|
||
By default, the email's subject is the class name of the notification
|
||
formatted to "Title Case". So, if your notification class is named
|
||
`InvoicePaid`, the email's subject will be `Invoice Paid`. If you would like
|
||
to specify a different subject for the message, you may call the `subject`
|
||
method when building your message:
|
||
|
||
|
||
|
||
1/**
|
||
|
||
2 * Get the mail representation of the notification.
|
||
|
||
3 */
|
||
|
||
4public function toMail(object $notifiable): MailMessage
|
||
|
||
5{
|
||
|
||
6 return (new MailMessage)
|
||
|
||
7 ->subject('Notification Subject')
|
||
|
||
8 ->line('...');
|
||
|
||
9}
|
||
|
||
|
||
/**
|
||
* Get the mail representation of the notification.
|
||
*/
|
||
public function toMail(object $notifiable): MailMessage
|
||
{
|
||
return (new MailMessage)
|
||
->subject('Notification Subject')
|
||
->line('...');
|
||
}
|
||
|
||
### Customizing the Mailer
|
||
|
||
By default, the email notification will be sent using the default mailer
|
||
defined in the `config/mail.php` configuration file. However, you may specify
|
||
a different mailer at runtime by calling the `mailer` method when building
|
||
your message:
|
||
|
||
|
||
|
||
1/**
|
||
|
||
2 * Get the mail representation of the notification.
|
||
|
||
3 */
|
||
|
||
4public function toMail(object $notifiable): MailMessage
|
||
|
||
5{
|
||
|
||
6 return (new MailMessage)
|
||
|
||
7 ->mailer('postmark')
|
||
|
||
8 ->line('...');
|
||
|
||
9}
|
||
|
||
|
||
/**
|
||
* Get the mail representation of the notification.
|
||
*/
|
||
public function toMail(object $notifiable): MailMessage
|
||
{
|
||
return (new MailMessage)
|
||
->mailer('postmark')
|
||
->line('...');
|
||
}
|
||
|
||
### Customizing the Templates
|
||
|
||
You can modify the HTML and plain-text template used by mail notifications by
|
||
publishing the notification package's resources. After running this command,
|
||
the mail notification templates will be located in the
|
||
`resources/views/vendor/notifications` directory:
|
||
|
||
|
||
|
||
1php artisan vendor:publish --tag=laravel-notifications
|
||
|
||
|
||
php artisan vendor:publish --tag=laravel-notifications
|
||
|
||
### Attachments
|
||
|
||
To add attachments to an email notification, use the `attach` method while
|
||
building your message. The `attach` method accepts the absolute path to the
|
||
file as its first argument:
|
||
|
||
|
||
|
||
1/**
|
||
|
||
2 * Get the mail representation of the notification.
|
||
|
||
3 */
|
||
|
||
4public function toMail(object $notifiable): MailMessage
|
||
|
||
5{
|
||
|
||
6 return (new MailMessage)
|
||
|
||
7 ->greeting('Hello!')
|
||
|
||
8 ->attach('/path/to/file');
|
||
|
||
9}
|
||
|
||
|
||
/**
|
||
* Get the mail representation of the notification.
|
||
*/
|
||
public function toMail(object $notifiable): MailMessage
|
||
{
|
||
return (new MailMessage)
|
||
->greeting('Hello!')
|
||
->attach('/path/to/file');
|
||
}
|
||
|
||
The `attach` method offered by notification mail messages also accepts
|
||
[attachable objects](/docs/12.x/mail#attachable-objects). Please consult the
|
||
comprehensive [attachable object documentation](/docs/12.x/mail#attachable-
|
||
objects) to learn more.
|
||
|
||
When attaching files to a message, you may also specify the display name and /
|
||
or MIME type by passing an `array` as the second argument to the `attach`
|
||
method:
|
||
|
||
|
||
|
||
1/**
|
||
|
||
2 * Get the mail representation of the notification.
|
||
|
||
3 */
|
||
|
||
4public function toMail(object $notifiable): MailMessage
|
||
|
||
5{
|
||
|
||
6 return (new MailMessage)
|
||
|
||
7 ->greeting('Hello!')
|
||
|
||
8 ->attach('/path/to/file', [
|
||
|
||
9 'as' => 'name.pdf',
|
||
|
||
10 'mime' => 'application/pdf',
|
||
|
||
11 ]);
|
||
|
||
12}
|
||
|
||
|
||
/**
|
||
* Get the mail representation of the notification.
|
||
*/
|
||
public function toMail(object $notifiable): MailMessage
|
||
{
|
||
return (new MailMessage)
|
||
->greeting('Hello!')
|
||
->attach('/path/to/file', [
|
||
'as' => 'name.pdf',
|
||
'mime' => 'application/pdf',
|
||
]);
|
||
}
|
||
|
||
Unlike attaching files in mailable objects, you may not attach a file directly
|
||
from a storage disk using `attachFromStorage`. You should rather use the
|
||
`attach` method with an absolute path to the file on the storage disk.
|
||
Alternatively, you could return a [mailable](/docs/12.x/mail#generating-
|
||
mailables) from the `toMail` method:
|
||
|
||
|
||
|
||
1use App\Mail\InvoicePaid as InvoicePaidMailable;
|
||
|
||
2
|
||
|
||
3/**
|
||
|
||
4 * Get the mail representation of the notification.
|
||
|
||
5 */
|
||
|
||
6public function toMail(object $notifiable): Mailable
|
||
|
||
7{
|
||
|
||
8 return (new InvoicePaidMailable($this->invoice))
|
||
|
||
9 ->to($notifiable->email)
|
||
|
||
10 ->attachFromStorage('/path/to/file');
|
||
|
||
11}
|
||
|
||
|
||
use App\Mail\InvoicePaid as InvoicePaidMailable;
|
||
|
||
/**
|
||
* Get the mail representation of the notification.
|
||
*/
|
||
public function toMail(object $notifiable): Mailable
|
||
{
|
||
return (new InvoicePaidMailable($this->invoice))
|
||
->to($notifiable->email)
|
||
->attachFromStorage('/path/to/file');
|
||
}
|
||
|
||
When necessary, multiple files may be attached to a message using the
|
||
`attachMany` method:
|
||
|
||
|
||
|
||
1/**
|
||
|
||
2 * Get the mail representation of the notification.
|
||
|
||
3 */
|
||
|
||
4public function toMail(object $notifiable): MailMessage
|
||
|
||
5{
|
||
|
||
6 return (new MailMessage)
|
||
|
||
7 ->greeting('Hello!')
|
||
|
||
8 ->attachMany([
|
||
|
||
9 '/path/to/forge.svg',
|
||
|
||
10 '/path/to/vapor.svg' => [
|
||
|
||
11 'as' => 'Logo.svg',
|
||
|
||
12 'mime' => 'image/svg+xml',
|
||
|
||
13 ],
|
||
|
||
14 ]);
|
||
|
||
15}
|
||
|
||
|
||
/**
|
||
* Get the mail representation of the notification.
|
||
*/
|
||
public function toMail(object $notifiable): MailMessage
|
||
{
|
||
return (new MailMessage)
|
||
->greeting('Hello!')
|
||
->attachMany([
|
||
'/path/to/forge.svg',
|
||
'/path/to/vapor.svg' => [
|
||
'as' => 'Logo.svg',
|
||
'mime' => 'image/svg+xml',
|
||
],
|
||
]);
|
||
}
|
||
|
||
#### Raw Data Attachments
|
||
|
||
The `attachData` method may be used to attach a raw string of bytes as an
|
||
attachment. When calling the `attachData` method, you should provide the
|
||
filename that should be assigned to the attachment:
|
||
|
||
|
||
|
||
1/**
|
||
|
||
2 * Get the mail representation of the notification.
|
||
|
||
3 */
|
||
|
||
4public function toMail(object $notifiable): MailMessage
|
||
|
||
5{
|
||
|
||
6 return (new MailMessage)
|
||
|
||
7 ->greeting('Hello!')
|
||
|
||
8 ->attachData($this->pdf, 'name.pdf', [
|
||
|
||
9 'mime' => 'application/pdf',
|
||
|
||
10 ]);
|
||
|
||
11}
|
||
|
||
|
||
/**
|
||
* Get the mail representation of the notification.
|
||
*/
|
||
public function toMail(object $notifiable): MailMessage
|
||
{
|
||
return (new MailMessage)
|
||
->greeting('Hello!')
|
||
->attachData($this->pdf, 'name.pdf', [
|
||
'mime' => 'application/pdf',
|
||
]);
|
||
}
|
||
|
||
### Adding Tags and Metadata
|
||
|
||
Some third-party email providers such as Mailgun and Postmark support message
|
||
"tags" and "metadata", which may be used to group and track emails sent by
|
||
your application. You may add tags and metadata to an email message via the
|
||
`tag` and `metadata` methods:
|
||
|
||
|
||
|
||
1/**
|
||
|
||
2 * Get the mail representation of the notification.
|
||
|
||
3 */
|
||
|
||
4public function toMail(object $notifiable): MailMessage
|
||
|
||
5{
|
||
|
||
6 return (new MailMessage)
|
||
|
||
7 ->greeting('Comment Upvoted!')
|
||
|
||
8 ->tag('upvote')
|
||
|
||
9 ->metadata('comment_id', $this->comment->id);
|
||
|
||
10}
|
||
|
||
|
||
/**
|
||
* Get the mail representation of the notification.
|
||
*/
|
||
public function toMail(object $notifiable): MailMessage
|
||
{
|
||
return (new MailMessage)
|
||
->greeting('Comment Upvoted!')
|
||
->tag('upvote')
|
||
->metadata('comment_id', $this->comment->id);
|
||
}
|
||
|
||
If your application is using the Mailgun driver, you may consult Mailgun's
|
||
documentation for more information on
|
||
[tags](https://documentation.mailgun.com/docs/mailgun/user-manual/tracking-
|
||
messages/#tags) and
|
||
[metadata](https://documentation.mailgun.com/docs/mailgun/user-manual/sending-
|
||
messages/#attaching-metadata-to-messages). Likewise, the Postmark
|
||
documentation may also be consulted for more information on their support for
|
||
[tags](https://postmarkapp.com/blog/tags-support-for-smtp) and
|
||
[metadata](https://postmarkapp.com/support/article/1125-custom-metadata-faq).
|
||
|
||
If your application is using Amazon SES to send emails, you should use the
|
||
`metadata` method to attach [SES
|
||
"tags"](https://docs.aws.amazon.com/ses/latest/APIReference/API_MessageTag.html)
|
||
to the message.
|
||
|
||
### Customizing the Symfony Message
|
||
|
||
The `withSymfonyMessage` method of the `MailMessage` class allows you to
|
||
register a closure which will be invoked with the Symfony Message instance
|
||
before sending the message. This gives you an opportunity to deeply customize
|
||
the message before it is delivered:
|
||
|
||
|
||
|
||
1use Symfony\Component\Mime\Email;
|
||
|
||
2
|
||
|
||
3/**
|
||
|
||
4 * Get the mail representation of the notification.
|
||
|
||
5 */
|
||
|
||
6public function toMail(object $notifiable): MailMessage
|
||
|
||
7{
|
||
|
||
8 return (new MailMessage)
|
||
|
||
9 ->withSymfonyMessage(function (Email $message) {
|
||
|
||
10 $message->getHeaders()->addTextHeader(
|
||
|
||
11 'Custom-Header', 'Header Value'
|
||
|
||
12 );
|
||
|
||
13 });
|
||
|
||
14}
|
||
|
||
|
||
use Symfony\Component\Mime\Email;
|
||
|
||
/**
|
||
* Get the mail representation of the notification.
|
||
*/
|
||
public function toMail(object $notifiable): MailMessage
|
||
{
|
||
return (new MailMessage)
|
||
->withSymfonyMessage(function (Email $message) {
|
||
$message->getHeaders()->addTextHeader(
|
||
'Custom-Header', 'Header Value'
|
||
);
|
||
});
|
||
}
|
||
|
||
### Using Mailables
|
||
|
||
If needed, you may return a full [mailable object](/docs/12.x/mail) from your
|
||
notification's `toMail` method. When returning a `Mailable` instead of a
|
||
`MailMessage`, you will need to specify the message recipient using the
|
||
mailable object's `to` method:
|
||
|
||
|
||
|
||
1use App\Mail\InvoicePaid as InvoicePaidMailable;
|
||
|
||
2use Illuminate\Mail\Mailable;
|
||
|
||
3
|
||
|
||
4/**
|
||
|
||
5 * Get the mail representation of the notification.
|
||
|
||
6 */
|
||
|
||
7public function toMail(object $notifiable): Mailable
|
||
|
||
8{
|
||
|
||
9 return (new InvoicePaidMailable($this->invoice))
|
||
|
||
10 ->to($notifiable->email);
|
||
|
||
11}
|
||
|
||
|
||
use App\Mail\InvoicePaid as InvoicePaidMailable;
|
||
use Illuminate\Mail\Mailable;
|
||
|
||
/**
|
||
* Get the mail representation of the notification.
|
||
*/
|
||
public function toMail(object $notifiable): Mailable
|
||
{
|
||
return (new InvoicePaidMailable($this->invoice))
|
||
->to($notifiable->email);
|
||
}
|
||
|
||
#### Mailables and On-Demand Notifications
|
||
|
||
If you are sending an on-demand notification, the `$notifiable` instance given
|
||
to the `toMail` method will be an instance of
|
||
`Illuminate\Notifications\AnonymousNotifiable`, which offers a
|
||
`routeNotificationFor` method that may be used to retrieve the email address
|
||
the on-demand notification should be sent to:
|
||
|
||
|
||
|
||
1use App\Mail\InvoicePaid as InvoicePaidMailable;
|
||
|
||
2use Illuminate\Notifications\AnonymousNotifiable;
|
||
|
||
3use Illuminate\Mail\Mailable;
|
||
|
||
4
|
||
|
||
5/**
|
||
|
||
6 * Get the mail representation of the notification.
|
||
|
||
7 */
|
||
|
||
8public function toMail(object $notifiable): Mailable
|
||
|
||
9{
|
||
|
||
10 $address = $notifiable instanceof AnonymousNotifiable
|
||
|
||
11 ? $notifiable->routeNotificationFor('mail')
|
||
|
||
12 : $notifiable->email;
|
||
|
||
13
|
||
|
||
14 return (new InvoicePaidMailable($this->invoice))
|
||
|
||
15 ->to($address);
|
||
|
||
16}
|
||
|
||
|
||
use App\Mail\InvoicePaid as InvoicePaidMailable;
|
||
use Illuminate\Notifications\AnonymousNotifiable;
|
||
use Illuminate\Mail\Mailable;
|
||
|
||
/**
|
||
* Get the mail representation of the notification.
|
||
*/
|
||
public function toMail(object $notifiable): Mailable
|
||
{
|
||
$address = $notifiable instanceof AnonymousNotifiable
|
||
? $notifiable->routeNotificationFor('mail')
|
||
: $notifiable->email;
|
||
|
||
return (new InvoicePaidMailable($this->invoice))
|
||
->to($address);
|
||
}
|
||
|
||
### Previewing Mail Notifications
|
||
|
||
When designing a mail notification template, it is convenient to quickly
|
||
preview the rendered mail message in your browser like a typical Blade
|
||
template. For this reason, Laravel allows you to return any mail message
|
||
generated by a mail notification directly from a route closure or controller.
|
||
When a `MailMessage` is returned, it will be rendered and displayed in the
|
||
browser, allowing you to quickly preview its design without needing to send it
|
||
to an actual email address:
|
||
|
||
|
||
|
||
1use App\Models\Invoice;
|
||
|
||
2use App\Notifications\InvoicePaid;
|
||
|
||
3
|
||
|
||
4Route::get('/notification', function () {
|
||
|
||
5 $invoice = Invoice::find(1);
|
||
|
||
6
|
||
|
||
7 return (new InvoicePaid($invoice))
|
||
|
||
8 ->toMail($invoice->user);
|
||
|
||
9});
|
||
|
||
|
||
use App\Models\Invoice;
|
||
use App\Notifications\InvoicePaid;
|
||
|
||
Route::get('/notification', function () {
|
||
$invoice = Invoice::find(1);
|
||
|
||
return (new InvoicePaid($invoice))
|
||
->toMail($invoice->user);
|
||
});
|
||
|
||
## Markdown Mail Notifications
|
||
|
||
Markdown mail notifications allow you to take advantage of the pre-built
|
||
templates of mail notifications, while giving you more freedom to write
|
||
longer, customized messages. Since the messages are written in Markdown,
|
||
Laravel is able to render beautiful, responsive HTML templates for the
|
||
messages while also automatically generating a plain-text counterpart.
|
||
|
||
### Generating the Message
|
||
|
||
To generate a notification with a corresponding Markdown template, you may use
|
||
the `--markdown` option of the `make:notification` Artisan command:
|
||
|
||
|
||
|
||
1php artisan make:notification InvoicePaid --markdown=mail.invoice.paid
|
||
|
||
|
||
php artisan make:notification InvoicePaid --markdown=mail.invoice.paid
|
||
|
||
Like all other mail notifications, notifications that use Markdown templates
|
||
should define a `toMail` method on their notification class. However, instead
|
||
of using the `line` and `action` methods to construct the notification, use
|
||
the `markdown` method to specify the name of the Markdown template that should
|
||
be used. An array of data you wish to make available to the template may be
|
||
passed as the method's second argument:
|
||
|
||
|
||
|
||
1/**
|
||
|
||
2 * Get the mail representation of the notification.
|
||
|
||
3 */
|
||
|
||
4public function toMail(object $notifiable): MailMessage
|
||
|
||
5{
|
||
|
||
6 $url = url('/invoice/'.$this->invoice->id);
|
||
|
||
7
|
||
|
||
8 return (new MailMessage)
|
||
|
||
9 ->subject('Invoice Paid')
|
||
|
||
10 ->markdown('mail.invoice.paid', ['url' => $url]);
|
||
|
||
11}
|
||
|
||
|
||
/**
|
||
* Get the mail representation of the notification.
|
||
*/
|
||
public function toMail(object $notifiable): MailMessage
|
||
{
|
||
$url = url('/invoice/'.$this->invoice->id);
|
||
|
||
return (new MailMessage)
|
||
->subject('Invoice Paid')
|
||
->markdown('mail.invoice.paid', ['url' => $url]);
|
||
}
|
||
|
||
### Writing the Message
|
||
|
||
Markdown mail notifications use a combination of Blade components and Markdown
|
||
syntax which allow you to easily construct notifications while leveraging
|
||
Laravel's pre-crafted notification components:
|
||
|
||
|
||
|
||
1<x-mail::message>
|
||
|
||
2# Invoice Paid
|
||
|
||
3
|
||
|
||
4Your invoice has been paid!
|
||
|
||
5
|
||
|
||
6<x-mail::button :url="$url">
|
||
|
||
7View Invoice
|
||
|
||
8</x-mail::button>
|
||
|
||
9
|
||
|
||
10Thanks,<br>
|
||
|
||
11{{ config('app.name') }}
|
||
|
||
12</x-mail::message>
|
||
|
||
|
||
<x-mail::message>
|
||
# Invoice Paid
|
||
|
||
Your invoice has been paid!
|
||
|
||
<x-mail::button :url="$url">
|
||
View Invoice
|
||
</x-mail::button>
|
||
|
||
Thanks,<br>
|
||
{{ config('app.name') }}
|
||
</x-mail::message>
|
||
|
||
Do not use excess indentation when writing Markdown emails. Per Markdown
|
||
standards, Markdown parsers will render indented content as code blocks.
|
||
|
||
#### Button Component
|
||
|
||
The button component renders a centered button link. The component accepts two
|
||
arguments, a `url` and an optional `color`. Supported colors are `primary`,
|
||
`green`, and `red`. You may add as many button components to a notification as
|
||
you wish:
|
||
|
||
|
||
|
||
1<x-mail::button :url="$url" color="green">
|
||
|
||
2View Invoice
|
||
|
||
3</x-mail::button>
|
||
|
||
|
||
<x-mail::button :url="$url" color="green">
|
||
View Invoice
|
||
</x-mail::button>
|
||
|
||
#### Panel Component
|
||
|
||
The panel component renders the given block of text in a panel that has a
|
||
slightly different background color than the rest of the notification. This
|
||
allows you to draw attention to a given block of text:
|
||
|
||
|
||
|
||
1<x-mail::panel>
|
||
|
||
2This is the panel content.
|
||
|
||
3</x-mail::panel>
|
||
|
||
|
||
<x-mail::panel>
|
||
This is the panel content.
|
||
</x-mail::panel>
|
||
|
||
#### Table Component
|
||
|
||
The table component allows you to transform a Markdown table into an HTML
|
||
table. The component accepts the Markdown table as its content. Table column
|
||
alignment is supported using the default Markdown table alignment syntax:
|
||
|
||
|
||
|
||
1<x-mail::table>
|
||
|
||
2| Laravel | Table | Example |
|
||
|
||
3| ------------- | :-----------: | ------------: |
|
||
|
||
4| Col 2 is | Centered | $10 |
|
||
|
||
5| Col 3 is | Right-Aligned | $20 |
|
||
|
||
6</x-mail::table>
|
||
|
||
|
||
<x-mail::table>
|
||
| Laravel | Table | Example |
|
||
| ------------- | :-----------: | ------------: |
|
||
| Col 2 is | Centered | $10 |
|
||
| Col 3 is | Right-Aligned | $20 |
|
||
</x-mail::table>
|
||
|
||
### Customizing the Components
|
||
|
||
You may export all of the Markdown notification components to your own
|
||
application for customization. To export the components, use the
|
||
`vendor:publish` Artisan command to publish the `laravel-mail` asset tag:
|
||
|
||
|
||
|
||
1php artisan vendor:publish --tag=laravel-mail
|
||
|
||
|
||
php artisan vendor:publish --tag=laravel-mail
|
||
|
||
This command will publish the Markdown mail components to the
|
||
`resources/views/vendor/mail` directory. The `mail` directory will contain an
|
||
`html` and a `text` directory, each containing their respective
|
||
representations of every available component. You are free to customize these
|
||
components however you like.
|
||
|
||
#### Customizing the CSS
|
||
|
||
After exporting the components, the `resources/views/vendor/mail/html/themes`
|
||
directory will contain a `default.css` file. You may customize the CSS in this
|
||
file and your styles will automatically be in-lined within the HTML
|
||
representations of your Markdown notifications.
|
||
|
||
If you would like to build an entirely new theme for Laravel's Markdown
|
||
components, you may place a CSS file within the `html/themes` directory. After
|
||
naming and saving your CSS file, update the `theme` option of the `mail`
|
||
configuration file to match the name of your new theme.
|
||
|
||
To customize the theme for an individual notification, you may call the
|
||
`theme` method while building the notification's mail message. The `theme`
|
||
method accepts the name of the theme that should be used when sending the
|
||
notification:
|
||
|
||
|
||
|
||
1/**
|
||
|
||
2 * Get the mail representation of the notification.
|
||
|
||
3 */
|
||
|
||
4public function toMail(object $notifiable): MailMessage
|
||
|
||
5{
|
||
|
||
6 return (new MailMessage)
|
||
|
||
7 ->theme('invoice')
|
||
|
||
8 ->subject('Invoice Paid')
|
||
|
||
9 ->markdown('mail.invoice.paid', ['url' => $url]);
|
||
|
||
10}
|
||
|
||
|
||
/**
|
||
* Get the mail representation of the notification.
|
||
*/
|
||
public function toMail(object $notifiable): MailMessage
|
||
{
|
||
return (new MailMessage)
|
||
->theme('invoice')
|
||
->subject('Invoice Paid')
|
||
->markdown('mail.invoice.paid', ['url' => $url]);
|
||
}
|
||
|
||
## Database Notifications
|
||
|
||
### Prerequisites
|
||
|
||
The `database` notification channel stores the notification information in a
|
||
database table. This table will contain information such as the notification
|
||
type as well as a JSON data structure that describes the notification.
|
||
|
||
You can query the table to display the notifications in your application's
|
||
user interface. But, before you can do that, you will need to create a
|
||
database table to hold your notifications. You may use the
|
||
`make:notifications-table` command to generate a
|
||
[migration](/docs/12.x/migrations) with the proper table schema:
|
||
|
||
|
||
|
||
1php artisan make:notifications-table
|
||
|
||
2
|
||
|
||
3php artisan migrate
|
||
|
||
|
||
php artisan make:notifications-table
|
||
|
||
php artisan migrate
|
||
|
||
If your notifiable models are using [UUID or ULID primary
|
||
keys](/docs/12.x/eloquent#uuid-and-ulid-keys), you should replace the `morphs`
|
||
method with [uuidMorphs](/docs/12.x/migrations#column-method-uuidMorphs) or
|
||
[ulidMorphs](/docs/12.x/migrations#column-method-ulidMorphs) in the
|
||
notification table migration.
|
||
|
||
### Formatting Database Notifications
|
||
|
||
If a notification supports being stored in a database table, you should define
|
||
a `toDatabase` or `toArray` method on the notification class. This method will
|
||
receive a `$notifiable` entity and should return a plain PHP array. The
|
||
returned array will be encoded as JSON and stored in the `data` column of your
|
||
`notifications` table. Let's take a look at an example `toArray` method:
|
||
|
||
|
||
|
||
1/**
|
||
|
||
2 * Get the array representation of the notification.
|
||
|
||
3 *
|
||
|
||
4 * @return array<string, mixed>
|
||
|
||
5 */
|
||
|
||
6public function toArray(object $notifiable): array
|
||
|
||
7{
|
||
|
||
8 return [
|
||
|
||
9 'invoice_id' => $this->invoice->id,
|
||
|
||
10 'amount' => $this->invoice->amount,
|
||
|
||
11 ];
|
||
|
||
12}
|
||
|
||
|
||
/**
|
||
* Get the array representation of the notification.
|
||
*
|
||
* @return array<string, mixed>
|
||
*/
|
||
public function toArray(object $notifiable): array
|
||
{
|
||
return [
|
||
'invoice_id' => $this->invoice->id,
|
||
'amount' => $this->invoice->amount,
|
||
];
|
||
}
|
||
|
||
When a notification is stored in your application's database, the `type`
|
||
column will be set to the notification's class name by default, and the
|
||
`read_at` column will be `null`. However, you can customize this behavior by
|
||
defining the `databaseType` and `initialDatabaseReadAtValue` methods in your
|
||
notification class:
|
||
|
||
|
||
|
||
1use Illuminate\Support\Carbon;
|
||
|
||
2
|
||
|
||
3/**
|
||
|
||
4 * Get the notification's database type.
|
||
|
||
5 */
|
||
|
||
6public function databaseType(object $notifiable): string
|
||
|
||
7{
|
||
|
||
8 return 'invoice-paid';
|
||
|
||
9}
|
||
|
||
10
|
||
|
||
11/**
|
||
|
||
12 * Get the initial value for the "read_at" column.
|
||
|
||
13 */
|
||
|
||
14public function initialDatabaseReadAtValue(): ?Carbon
|
||
|
||
15{
|
||
|
||
16 return null;
|
||
|
||
17}
|
||
|
||
|
||
use Illuminate\Support\Carbon;
|
||
|
||
/**
|
||
* Get the notification's database type.
|
||
*/
|
||
public function databaseType(object $notifiable): string
|
||
{
|
||
return 'invoice-paid';
|
||
}
|
||
|
||
/**
|
||
* Get the initial value for the "read_at" column.
|
||
*/
|
||
public function initialDatabaseReadAtValue(): ?Carbon
|
||
{
|
||
return null;
|
||
}
|
||
|
||
#### `toDatabase` vs. `toArray`
|
||
|
||
The `toArray` method is also used by the `broadcast` channel to determine
|
||
which data to broadcast to your JavaScript powered frontend. If you would like
|
||
to have two different array representations for the `database` and `broadcast`
|
||
channels, you should define a `toDatabase` method instead of a `toArray`
|
||
method.
|
||
|
||
### Accessing the Notifications
|
||
|
||
Once notifications are stored in the database, you need a convenient way to
|
||
access them from your notifiable entities. The
|
||
`Illuminate\Notifications\Notifiable` trait, which is included on Laravel's
|
||
default `App\Models\User` model, includes a `notifications` [Eloquent
|
||
relationship](/docs/12.x/eloquent-relationships) that returns the
|
||
notifications for the entity. To fetch notifications, you may access this
|
||
method like any other Eloquent relationship. By default, notifications will be
|
||
sorted by the `created_at` timestamp with the most recent notifications at the
|
||
beginning of the collection:
|
||
|
||
|
||
|
||
1$user = App\Models\User::find(1);
|
||
|
||
2
|
||
|
||
3foreach ($user->notifications as $notification) {
|
||
|
||
4 echo $notification->type;
|
||
|
||
5}
|
||
|
||
|
||
$user = App\Models\User::find(1);
|
||
|
||
foreach ($user->notifications as $notification) {
|
||
echo $notification->type;
|
||
}
|
||
|
||
If you want to retrieve only the "unread" notifications, you may use the
|
||
`unreadNotifications` relationship. Again, these notifications will be sorted
|
||
by the `created_at` timestamp with the most recent notifications at the
|
||
beginning of the collection:
|
||
|
||
|
||
|
||
1$user = App\Models\User::find(1);
|
||
|
||
2
|
||
|
||
3foreach ($user->unreadNotifications as $notification) {
|
||
|
||
4 echo $notification->type;
|
||
|
||
5}
|
||
|
||
|
||
$user = App\Models\User::find(1);
|
||
|
||
foreach ($user->unreadNotifications as $notification) {
|
||
echo $notification->type;
|
||
}
|
||
|
||
If you want to retrieve only the "read" notifications, you may use the
|
||
`readNotifications` relationship:
|
||
|
||
|
||
|
||
1$user = App\Models\User::find(1);
|
||
|
||
2
|
||
|
||
3foreach ($user->readNotifications as $notification) {
|
||
|
||
4 echo $notification->type;
|
||
|
||
5}
|
||
|
||
|
||
$user = App\Models\User::find(1);
|
||
|
||
foreach ($user->readNotifications as $notification) {
|
||
echo $notification->type;
|
||
}
|
||
|
||
To access your notifications from your JavaScript client, you should define a
|
||
notification controller for your application which returns the notifications
|
||
for a notifiable entity, such as the current user. You may then make an HTTP
|
||
request to that controller's URL from your JavaScript client.
|
||
|
||
### Marking Notifications as Read
|
||
|
||
Typically, you will want to mark a notification as "read" when a user views
|
||
it. The `Illuminate\Notifications\Notifiable` trait provides a `markAsRead`
|
||
method, which updates the `read_at` column on the notification's database
|
||
record:
|
||
|
||
|
||
|
||
1$user = App\Models\User::find(1);
|
||
|
||
2
|
||
|
||
3foreach ($user->unreadNotifications as $notification) {
|
||
|
||
4 $notification->markAsRead();
|
||
|
||
5}
|
||
|
||
|
||
$user = App\Models\User::find(1);
|
||
|
||
foreach ($user->unreadNotifications as $notification) {
|
||
$notification->markAsRead();
|
||
}
|
||
|
||
However, instead of looping through each notification, you may use the
|
||
`markAsRead` method directly on a collection of notifications:
|
||
|
||
|
||
|
||
1$user->unreadNotifications->markAsRead();
|
||
|
||
|
||
$user->unreadNotifications->markAsRead();
|
||
|
||
You may also use a mass-update query to mark all of the notifications as read
|
||
without retrieving them from the database:
|
||
|
||
|
||
|
||
1$user = App\Models\User::find(1);
|
||
|
||
2
|
||
|
||
3$user->unreadNotifications()->update(['read_at' => now()]);
|
||
|
||
|
||
$user = App\Models\User::find(1);
|
||
|
||
$user->unreadNotifications()->update(['read_at' => now()]);
|
||
|
||
You may `delete` the notifications to remove them from the table entirely:
|
||
|
||
|
||
|
||
1$user->notifications()->delete();
|
||
|
||
|
||
$user->notifications()->delete();
|
||
|
||
## Broadcast Notifications
|
||
|
||
### Prerequisites
|
||
|
||
Before broadcasting notifications, you should configure and be familiar with
|
||
Laravel's [event broadcasting](/docs/12.x/broadcasting) services. Event
|
||
broadcasting provides a way to react to server-side Laravel events from your
|
||
JavaScript powered frontend.
|
||
|
||
### Formatting Broadcast Notifications
|
||
|
||
The `broadcast` channel broadcasts notifications using Laravel's [event
|
||
broadcasting](/docs/12.x/broadcasting) services, allowing your JavaScript
|
||
powered frontend to catch notifications in realtime. If a notification
|
||
supports broadcasting, you can define a `toBroadcast` method on the
|
||
notification class. This method will receive a `$notifiable` entity and should
|
||
return a `BroadcastMessage` instance. If the `toBroadcast` method does not
|
||
exist, the `toArray` method will be used to gather the data that should be
|
||
broadcast. The returned data will be encoded as JSON and broadcast to your
|
||
JavaScript powered frontend. Let's take a look at an example `toBroadcast`
|
||
method:
|
||
|
||
|
||
|
||
1use Illuminate\Notifications\Messages\BroadcastMessage;
|
||
|
||
2
|
||
|
||
3/**
|
||
|
||
4 * Get the broadcastable representation of the notification.
|
||
|
||
5 */
|
||
|
||
6public function toBroadcast(object $notifiable): BroadcastMessage
|
||
|
||
7{
|
||
|
||
8 return new BroadcastMessage([
|
||
|
||
9 'invoice_id' => $this->invoice->id,
|
||
|
||
10 'amount' => $this->invoice->amount,
|
||
|
||
11 ]);
|
||
|
||
12}
|
||
|
||
|
||
use Illuminate\Notifications\Messages\BroadcastMessage;
|
||
|
||
/**
|
||
* Get the broadcastable representation of the notification.
|
||
*/
|
||
public function toBroadcast(object $notifiable): BroadcastMessage
|
||
{
|
||
return new BroadcastMessage([
|
||
'invoice_id' => $this->invoice->id,
|
||
'amount' => $this->invoice->amount,
|
||
]);
|
||
}
|
||
|
||
#### Broadcast Queue Configuration
|
||
|
||
All broadcast notifications are queued for broadcasting. If you would like to
|
||
configure the queue connection or queue name that is used to queue the
|
||
broadcast operation, you may use the `onConnection` and `onQueue` methods of
|
||
the `BroadcastMessage`:
|
||
|
||
|
||
|
||
1return (new BroadcastMessage($data))
|
||
|
||
2 ->onConnection('sqs')
|
||
|
||
3 ->onQueue('broadcasts');
|
||
|
||
|
||
return (new BroadcastMessage($data))
|
||
->onConnection('sqs')
|
||
->onQueue('broadcasts');
|
||
|
||
#### Customizing the Notification Type
|
||
|
||
In addition to the data you specify, all broadcast notifications also have a
|
||
`type` field containing the full class name of the notification. If you would
|
||
like to customize the notification `type`, you may define a `broadcastType`
|
||
method on the notification class:
|
||
|
||
|
||
|
||
1/**
|
||
|
||
2 * Get the type of the notification being broadcast.
|
||
|
||
3 */
|
||
|
||
4public function broadcastType(): string
|
||
|
||
5{
|
||
|
||
6 return 'broadcast.message';
|
||
|
||
7}
|
||
|
||
|
||
/**
|
||
* Get the type of the notification being broadcast.
|
||
*/
|
||
public function broadcastType(): string
|
||
{
|
||
return 'broadcast.message';
|
||
}
|
||
|
||
### Listening for Notifications
|
||
|
||
Notifications will broadcast on a private channel formatted using a
|
||
`{notifiable}.{id}` convention. So, if you are sending a notification to an
|
||
`App\Models\User` instance with an ID of `1`, the notification will be
|
||
broadcast on the `App.Models.User.1` private channel. When using [Laravel
|
||
Echo](/docs/12.x/broadcasting#client-side-installation), you may easily listen
|
||
for notifications on a channel using the `notification` method:
|
||
|
||
|
||
|
||
1Echo.private('App.Models.User.' + userId)
|
||
|
||
2 .notification((notification) => {
|
||
|
||
3 console.log(notification.type);
|
||
|
||
4 });
|
||
|
||
|
||
Echo.private('App.Models.User.' + userId)
|
||
.notification((notification) => {
|
||
console.log(notification.type);
|
||
});
|
||
|
||
#### Using React or Vue
|
||
|
||
Laravel Echo includes React and Vue hooks that make it painless to listen for
|
||
notifications. To get started, invoke the `useEchoNotification` hook, which is
|
||
used to listen for notifications. The `useEchoNotification` hook will
|
||
automatically leave channels when the consuming component is unmounted:
|
||
|
||
React Vue
|
||
|
||
|
||
|
||
1import { useEchoNotification } from "@laravel/echo-react";
|
||
|
||
2
|
||
|
||
3useEchoNotification(
|
||
|
||
4 `App.Models.User.${userId}`,
|
||
|
||
5 (notification) => {
|
||
|
||
6 console.log(notification.type);
|
||
|
||
7 },
|
||
|
||
8);
|
||
|
||
|
||
import { useEchoNotification } from "@laravel/echo-react";
|
||
|
||
useEchoNotification(
|
||
`App.Models.User.${userId}`,
|
||
(notification) => {
|
||
console.log(notification.type);
|
||
},
|
||
);
|
||
|
||
|
||
1<script setup lang="ts">
|
||
|
||
2import { useEchoNotification } from "@laravel/echo-vue";
|
||
|
||
3
|
||
|
||
4useEchoNotification(
|
||
|
||
5 `App.Models.User.${userId}`,
|
||
|
||
6 (notification) => {
|
||
|
||
7 console.log(notification.type);
|
||
|
||
8 },
|
||
|
||
9);
|
||
|
||
10</script>
|
||
|
||
|
||
<script setup lang="ts">
|
||
import { useEchoNotification } from "@laravel/echo-vue";
|
||
|
||
useEchoNotification(
|
||
`App.Models.User.${userId}`,
|
||
(notification) => {
|
||
console.log(notification.type);
|
||
},
|
||
);
|
||
</script>
|
||
|
||
By default, the hook listens to all notifications. To specify the notification
|
||
types you would like to listen to, you can provide either a string or array of
|
||
types to `useEchoNotification`:
|
||
|
||
React Vue
|
||
|
||
|
||
|
||
1import { useEchoNotification } from "@laravel/echo-react";
|
||
|
||
2
|
||
|
||
3useEchoNotification(
|
||
|
||
4 `App.Models.User.${userId}`,
|
||
|
||
5 (notification) => {
|
||
|
||
6 console.log(notification.type);
|
||
|
||
7 },
|
||
|
||
8 'App.Notifications.InvoicePaid',
|
||
|
||
9);
|
||
|
||
|
||
import { useEchoNotification } from "@laravel/echo-react";
|
||
|
||
useEchoNotification(
|
||
`App.Models.User.${userId}`,
|
||
(notification) => {
|
||
console.log(notification.type);
|
||
},
|
||
'App.Notifications.InvoicePaid',
|
||
);
|
||
|
||
|
||
1<script setup lang="ts">
|
||
|
||
2import { useEchoNotification } from "@laravel/echo-vue";
|
||
|
||
3
|
||
|
||
4useEchoNotification(
|
||
|
||
5 `App.Models.User.${userId}`,
|
||
|
||
6 (notification) => {
|
||
|
||
7 console.log(notification.type);
|
||
|
||
8 },
|
||
|
||
9 'App.Notifications.InvoicePaid',
|
||
|
||
10);
|
||
|
||
11</script>
|
||
|
||
|
||
<script setup lang="ts">
|
||
import { useEchoNotification } from "@laravel/echo-vue";
|
||
|
||
useEchoNotification(
|
||
`App.Models.User.${userId}`,
|
||
(notification) => {
|
||
console.log(notification.type);
|
||
},
|
||
'App.Notifications.InvoicePaid',
|
||
);
|
||
</script>
|
||
|
||
You may also specify the shape of the notification payload data, providing
|
||
greater type safety and editing convenience:
|
||
|
||
|
||
|
||
1type InvoicePaidNotification = {
|
||
|
||
2 invoice_id: number;
|
||
|
||
3 created_at: string;
|
||
|
||
4};
|
||
|
||
5
|
||
|
||
6useEchoNotification<InvoicePaidNotification>(
|
||
|
||
7 `App.Models.User.${userId}`,
|
||
|
||
8 (notification) => {
|
||
|
||
9 console.log(notification.invoice_id);
|
||
|
||
10 console.log(notification.created_at);
|
||
|
||
11 console.log(notification.type);
|
||
|
||
12 },
|
||
|
||
13 'App.Notifications.InvoicePaid',
|
||
|
||
14);
|
||
|
||
|
||
type InvoicePaidNotification = {
|
||
invoice_id: number;
|
||
created_at: string;
|
||
};
|
||
|
||
useEchoNotification<InvoicePaidNotification>(
|
||
`App.Models.User.${userId}`,
|
||
(notification) => {
|
||
console.log(notification.invoice_id);
|
||
console.log(notification.created_at);
|
||
console.log(notification.type);
|
||
},
|
||
'App.Notifications.InvoicePaid',
|
||
);
|
||
|
||
#### Customizing the Notification Channel
|
||
|
||
If you would like to customize which channel that an entity's broadcast
|
||
notifications are broadcast on, you may define a
|
||
`receivesBroadcastNotificationsOn` method on the notifiable entity:
|
||
|
||
|
||
|
||
1<?php
|
||
|
||
2
|
||
|
||
3namespace App\Models;
|
||
|
||
4
|
||
|
||
5use Illuminate\Broadcasting\PrivateChannel;
|
||
|
||
6use Illuminate\Foundation\Auth\User as Authenticatable;
|
||
|
||
7use Illuminate\Notifications\Notifiable;
|
||
|
||
8
|
||
|
||
9class User extends Authenticatable
|
||
|
||
10{
|
||
|
||
11 use Notifiable;
|
||
|
||
12
|
||
|
||
13 /**
|
||
|
||
14 * The channels the user receives notification broadcasts on.
|
||
|
||
15 */
|
||
|
||
16 public function receivesBroadcastNotificationsOn(): string
|
||
|
||
17 {
|
||
|
||
18 return 'users.'.$this->id;
|
||
|
||
19 }
|
||
|
||
20}
|
||
|
||
|
||
<?php
|
||
|
||
namespace App\Models;
|
||
|
||
use Illuminate\Broadcasting\PrivateChannel;
|
||
use Illuminate\Foundation\Auth\User as Authenticatable;
|
||
use Illuminate\Notifications\Notifiable;
|
||
|
||
class User extends Authenticatable
|
||
{
|
||
use Notifiable;
|
||
|
||
/**
|
||
* The channels the user receives notification broadcasts on.
|
||
*/
|
||
public function receivesBroadcastNotificationsOn(): string
|
||
{
|
||
return 'users.'.$this->id;
|
||
}
|
||
}
|
||
|
||
## SMS Notifications
|
||
|
||
### Prerequisites
|
||
|
||
Sending SMS notifications in Laravel is powered by
|
||
[Vonage](https://www.vonage.com/) (formerly known as Nexmo). Before you can
|
||
send notifications via Vonage, you need to install the `laravel/vonage-
|
||
notification-channel` and `guzzlehttp/guzzle` packages:
|
||
|
||
|
||
|
||
1composer require laravel/vonage-notification-channel guzzlehttp/guzzle
|
||
|
||
|
||
composer require laravel/vonage-notification-channel guzzlehttp/guzzle
|
||
|
||
The package includes a [configuration file](https://github.com/laravel/vonage-
|
||
notification-channel/blob/3.x/config/vonage.php). However, you are not
|
||
required to export this configuration file to your own application. You can
|
||
simply use the `VONAGE_KEY` and `VONAGE_SECRET` environment variables to
|
||
define your Vonage public and secret keys.
|
||
|
||
After defining your keys, you should set a `VONAGE_SMS_FROM` environment
|
||
variable that defines the phone number that your SMS messages should be sent
|
||
from by default. You may generate this phone number within the Vonage control
|
||
panel:
|
||
|
||
|
||
|
||
1VONAGE_SMS_FROM=15556666666
|
||
|
||
|
||
VONAGE_SMS_FROM=15556666666
|
||
|
||
### Formatting SMS Notifications
|
||
|
||
If a notification supports being sent as an SMS, you should define a
|
||
`toVonage` method on the notification class. This method will receive a
|
||
`$notifiable` entity and should return an
|
||
`Illuminate\Notifications\Messages\VonageMessage` instance:
|
||
|
||
|
||
|
||
1use Illuminate\Notifications\Messages\VonageMessage;
|
||
|
||
2
|
||
|
||
3/**
|
||
|
||
4 * Get the Vonage / SMS representation of the notification.
|
||
|
||
5 */
|
||
|
||
6public function toVonage(object $notifiable): VonageMessage
|
||
|
||
7{
|
||
|
||
8 return (new VonageMessage)
|
||
|
||
9 ->content('Your SMS message content');
|
||
|
||
10}
|
||
|
||
|
||
use Illuminate\Notifications\Messages\VonageMessage;
|
||
|
||
/**
|
||
* Get the Vonage / SMS representation of the notification.
|
||
*/
|
||
public function toVonage(object $notifiable): VonageMessage
|
||
{
|
||
return (new VonageMessage)
|
||
->content('Your SMS message content');
|
||
}
|
||
|
||
#### Unicode Content
|
||
|
||
If your SMS message will contain unicode characters, you should call the
|
||
`unicode` method when constructing the `VonageMessage` instance:
|
||
|
||
|
||
|
||
1use Illuminate\Notifications\Messages\VonageMessage;
|
||
|
||
2
|
||
|
||
3/**
|
||
|
||
4 * Get the Vonage / SMS representation of the notification.
|
||
|
||
5 */
|
||
|
||
6public function toVonage(object $notifiable): VonageMessage
|
||
|
||
7{
|
||
|
||
8 return (new VonageMessage)
|
||
|
||
9 ->content('Your unicode message')
|
||
|
||
10 ->unicode();
|
||
|
||
11}
|
||
|
||
|
||
use Illuminate\Notifications\Messages\VonageMessage;
|
||
|
||
/**
|
||
* Get the Vonage / SMS representation of the notification.
|
||
*/
|
||
public function toVonage(object $notifiable): VonageMessage
|
||
{
|
||
return (new VonageMessage)
|
||
->content('Your unicode message')
|
||
->unicode();
|
||
}
|
||
|
||
### Customizing the "From" Number
|
||
|
||
If you would like to send some notifications from a phone number that is
|
||
different from the phone number specified by your `VONAGE_SMS_FROM`
|
||
environment variable, you may call the `from` method on a `VonageMessage`
|
||
instance:
|
||
|
||
|
||
|
||
1use Illuminate\Notifications\Messages\VonageMessage;
|
||
|
||
2
|
||
|
||
3/**
|
||
|
||
4 * Get the Vonage / SMS representation of the notification.
|
||
|
||
5 */
|
||
|
||
6public function toVonage(object $notifiable): VonageMessage
|
||
|
||
7{
|
||
|
||
8 return (new VonageMessage)
|
||
|
||
9 ->content('Your SMS message content')
|
||
|
||
10 ->from('15554443333');
|
||
|
||
11}
|
||
|
||
|
||
use Illuminate\Notifications\Messages\VonageMessage;
|
||
|
||
/**
|
||
* Get the Vonage / SMS representation of the notification.
|
||
*/
|
||
public function toVonage(object $notifiable): VonageMessage
|
||
{
|
||
return (new VonageMessage)
|
||
->content('Your SMS message content')
|
||
->from('15554443333');
|
||
}
|
||
|
||
### Adding a Client Reference
|
||
|
||
If you would like to keep track of costs per user, team, or client, you may
|
||
add a "client reference" to the notification. Vonage will allow you to
|
||
generate reports using this client reference so that you can better understand
|
||
a particular customer's SMS usage. The client reference can be any string up
|
||
to 40 characters:
|
||
|
||
|
||
|
||
1use Illuminate\Notifications\Messages\VonageMessage;
|
||
|
||
2
|
||
|
||
3/**
|
||
|
||
4 * Get the Vonage / SMS representation of the notification.
|
||
|
||
5 */
|
||
|
||
6public function toVonage(object $notifiable): VonageMessage
|
||
|
||
7{
|
||
|
||
8 return (new VonageMessage)
|
||
|
||
9 ->clientReference((string) $notifiable->id)
|
||
|
||
10 ->content('Your SMS message content');
|
||
|
||
11}
|
||
|
||
|
||
use Illuminate\Notifications\Messages\VonageMessage;
|
||
|
||
/**
|
||
* Get the Vonage / SMS representation of the notification.
|
||
*/
|
||
public function toVonage(object $notifiable): VonageMessage
|
||
{
|
||
return (new VonageMessage)
|
||
->clientReference((string) $notifiable->id)
|
||
->content('Your SMS message content');
|
||
}
|
||
|
||
### Routing SMS Notifications
|
||
|
||
To route Vonage notifications to the proper phone number, define a
|
||
`routeNotificationForVonage` method on your notifiable entity:
|
||
|
||
|
||
|
||
1<?php
|
||
|
||
2
|
||
|
||
3namespace App\Models;
|
||
|
||
4
|
||
|
||
5use Illuminate\Foundation\Auth\User as Authenticatable;
|
||
|
||
6use Illuminate\Notifications\Notifiable;
|
||
|
||
7use Illuminate\Notifications\Notification;
|
||
|
||
8
|
||
|
||
9class User extends Authenticatable
|
||
|
||
10{
|
||
|
||
11 use Notifiable;
|
||
|
||
12
|
||
|
||
13 /**
|
||
|
||
14 * Route notifications for the Vonage channel.
|
||
|
||
15 */
|
||
|
||
16 public function routeNotificationForVonage(Notification $notification): string
|
||
|
||
17 {
|
||
|
||
18 return $this->phone_number;
|
||
|
||
19 }
|
||
|
||
20}
|
||
|
||
|
||
<?php
|
||
|
||
namespace App\Models;
|
||
|
||
use Illuminate\Foundation\Auth\User as Authenticatable;
|
||
use Illuminate\Notifications\Notifiable;
|
||
use Illuminate\Notifications\Notification;
|
||
|
||
class User extends Authenticatable
|
||
{
|
||
use Notifiable;
|
||
|
||
/**
|
||
* Route notifications for the Vonage channel.
|
||
*/
|
||
public function routeNotificationForVonage(Notification $notification): string
|
||
{
|
||
return $this->phone_number;
|
||
}
|
||
}
|
||
|
||
## Slack Notifications
|
||
|
||
### Prerequisites
|
||
|
||
Before sending Slack notifications, you should install the Slack notification
|
||
channel via Composer:
|
||
|
||
|
||
|
||
1composer require laravel/slack-notification-channel
|
||
|
||
|
||
composer require laravel/slack-notification-channel
|
||
|
||
Additionally, you must create a [Slack
|
||
App](https://api.slack.com/apps?new_app=1) for your Slack workspace.
|
||
|
||
If you only need to send notifications to the same Slack workspace that the
|
||
App is created in, you should ensure that your App has the `chat:write`,
|
||
`chat:write.public`, and `chat:write.customize` scopes. These scopes can be
|
||
added from the "OAuth & Permissions" App management tab within Slack.
|
||
|
||
Next, copy the App's "Bot User OAuth Token" and place it within a `slack`
|
||
configuration array in your application's `services.php` configuration file.
|
||
This token can be found on the "OAuth & Permissions" tab within Slack:
|
||
|
||
|
||
|
||
1'slack' => [
|
||
|
||
2 'notifications' => [
|
||
|
||
3 'bot_user_oauth_token' => env('SLACK_BOT_USER_OAUTH_TOKEN'),
|
||
|
||
4 'channel' => env('SLACK_BOT_USER_DEFAULT_CHANNEL'),
|
||
|
||
5 ],
|
||
|
||
6],
|
||
|
||
|
||
'slack' => [
|
||
'notifications' => [
|
||
'bot_user_oauth_token' => env('SLACK_BOT_USER_OAUTH_TOKEN'),
|
||
'channel' => env('SLACK_BOT_USER_DEFAULT_CHANNEL'),
|
||
],
|
||
],
|
||
|
||
#### App Distribution
|
||
|
||
If your application will be sending notifications to external Slack workspaces
|
||
that are owned by your application's users, you will need to "distribute" your
|
||
App via Slack. App distribution can be managed from your App's "Manage
|
||
Distribution" tab within Slack. Once your App has been distributed, you may
|
||
use [Socialite](/docs/12.x/socialite) to [obtain Slack Bot
|
||
tokens](/docs/12.x/socialite#slack-bot-scopes) on behalf of your application's
|
||
users.
|
||
|
||
### Formatting Slack Notifications
|
||
|
||
If a notification supports being sent as a Slack message, you should define a
|
||
`toSlack` method on the notification class. This method will receive a
|
||
`$notifiable` entity and should return an
|
||
`Illuminate\Notifications\Slack\SlackMessage` instance. You can construct rich
|
||
notifications using [Slack's Block Kit API](https://api.slack.com/block-kit).
|
||
The following example may be previewed in [Slack's Block Kit
|
||
builder](https://app.slack.com/block-kit-
|
||
builder/T01KWS6K23Z#%7B%22blocks%22:%5B%7B%22type%22:%22header%22,%22text%22:%7B%22type%22:%22plain_text%22,%22text%22:%22Invoice%20Paid%22%7D%7D,%7B%22type%22:%22context%22,%22elements%22:%5B%7B%22type%22:%22plain_text%22,%22text%22:%22Customer%20%231234%22%7D%5D%7D,%7B%22type%22:%22section%22,%22text%22:%7B%22type%22:%22plain_text%22,%22text%22:%22An%20invoice%20has%20been%20paid.%22%7D,%22fields%22:%5B%7B%22type%22:%22mrkdwn%22,%22text%22:%22*Invoice%20No:*%5Cn1000%22%7D,%7B%22type%22:%22mrkdwn%22,%22text%22:%22*Invoice%20Recipient:*%5Cntaylor@laravel.com%22%7D%5D%7D,%7B%22type%22:%22divider%22%7D,%7B%22type%22:%22section%22,%22text%22:%7B%22type%22:%22plain_text%22,%22text%22:%22Congratulations!%22%7D%7D%5D%7D):
|
||
|
||
|
||
|
||
1use Illuminate\Notifications\Slack\BlockKit\Blocks\ContextBlock;
|
||
|
||
2use Illuminate\Notifications\Slack\BlockKit\Blocks\SectionBlock;
|
||
|
||
3use Illuminate\Notifications\Slack\SlackMessage;
|
||
|
||
4
|
||
|
||
5/**
|
||
|
||
6 * Get the Slack representation of the notification.
|
||
|
||
7 */
|
||
|
||
8public function toSlack(object $notifiable): SlackMessage
|
||
|
||
9{
|
||
|
||
10 return (new SlackMessage)
|
||
|
||
11 ->text('One of your invoices has been paid!')
|
||
|
||
12 ->headerBlock('Invoice Paid')
|
||
|
||
13 ->contextBlock(function (ContextBlock $block) {
|
||
|
||
14 $block->text('Customer #1234');
|
||
|
||
15 })
|
||
|
||
16 ->sectionBlock(function (SectionBlock $block) {
|
||
|
||
17 $block->text('An invoice has been paid.');
|
||
|
||
18 $block->field("*Invoice No:*\n1000")->markdown();
|
||
|
||
19 $block->field("*Invoice Recipient:*\n[[email protected]](/cdn-cgi/l/email-protection)")->markdown();
|
||
|
||
20 })
|
||
|
||
21 ->dividerBlock()
|
||
|
||
22 ->sectionBlock(function (SectionBlock $block) {
|
||
|
||
23 $block->text('Congratulations!');
|
||
|
||
24 });
|
||
|
||
25}
|
||
|
||
|
||
use Illuminate\Notifications\Slack\BlockKit\Blocks\ContextBlock;
|
||
use Illuminate\Notifications\Slack\BlockKit\Blocks\SectionBlock;
|
||
use Illuminate\Notifications\Slack\SlackMessage;
|
||
|
||
/**
|
||
* Get the Slack representation of the notification.
|
||
*/
|
||
public function toSlack(object $notifiable): SlackMessage
|
||
{
|
||
return (new SlackMessage)
|
||
->text('One of your invoices has been paid!')
|
||
->headerBlock('Invoice Paid')
|
||
->contextBlock(function (ContextBlock $block) {
|
||
$block->text('Customer #1234');
|
||
})
|
||
->sectionBlock(function (SectionBlock $block) {
|
||
$block->text('An invoice has been paid.');
|
||
$block->field("*Invoice No:*\n1000")->markdown();
|
||
$block->field("*Invoice Recipient:*\[[email protected]](/cdn-cgi/l/email-protection)")->markdown();
|
||
})
|
||
->dividerBlock()
|
||
->sectionBlock(function (SectionBlock $block) {
|
||
$block->text('Congratulations!');
|
||
});
|
||
}
|
||
|
||
#### Using Slack's Block Kit Builder Template
|
||
|
||
Instead of using the fluent message builder methods to construct your Block
|
||
Kit message, you may provide the raw JSON payload generated by Slack's Block
|
||
Kit Builder to the `usingBlockKitTemplate` method:
|
||
|
||
|
||
|
||
1use Illuminate\Notifications\Slack\SlackMessage;
|
||
|
||
2use Illuminate\Support\Str;
|
||
|
||
3
|
||
|
||
4/**
|
||
|
||
5 * Get the Slack representation of the notification.
|
||
|
||
6 */
|
||
|
||
7public function toSlack(object $notifiable): SlackMessage
|
||
|
||
8{
|
||
|
||
9 $template = <<<JSON
|
||
|
||
10 {
|
||
|
||
11 "blocks": [
|
||
|
||
12 {
|
||
|
||
13 "type": "header",
|
||
|
||
14 "text": {
|
||
|
||
15 "type": "plain_text",
|
||
|
||
16 "text": "Team Announcement"
|
||
|
||
17 }
|
||
|
||
18 },
|
||
|
||
19 {
|
||
|
||
20 "type": "section",
|
||
|
||
21 "text": {
|
||
|
||
22 "type": "plain_text",
|
||
|
||
23 "text": "We are hiring!"
|
||
|
||
24 }
|
||
|
||
25 }
|
||
|
||
26 ]
|
||
|
||
27 }
|
||
|
||
28 JSON;
|
||
|
||
29
|
||
|
||
30 return (new SlackMessage)
|
||
|
||
31 ->usingBlockKitTemplate($template);
|
||
|
||
32}
|
||
|
||
|
||
use Illuminate\Notifications\Slack\SlackMessage;
|
||
use Illuminate\Support\Str;
|
||
|
||
/**
|
||
* Get the Slack representation of the notification.
|
||
*/
|
||
public function toSlack(object $notifiable): SlackMessage
|
||
{
|
||
$template = <<<JSON
|
||
{
|
||
"blocks": [
|
||
{
|
||
"type": "header",
|
||
"text": {
|
||
"type": "plain_text",
|
||
"text": "Team Announcement"
|
||
}
|
||
},
|
||
{
|
||
"type": "section",
|
||
"text": {
|
||
"type": "plain_text",
|
||
"text": "We are hiring!"
|
||
}
|
||
}
|
||
]
|
||
}
|
||
JSON;
|
||
|
||
return (new SlackMessage)
|
||
->usingBlockKitTemplate($template);
|
||
}
|
||
|
||
### Slack Interactivity
|
||
|
||
Slack's Block Kit notification system provides powerful features to [handle
|
||
user interaction](https://api.slack.com/interactivity/handling). To utilize
|
||
these features, your Slack App should have "Interactivity" enabled and a
|
||
"Request URL" configured that points to a URL served by your application.
|
||
These settings can be managed from the "Interactivity & Shortcuts" App
|
||
management tab within Slack.
|
||
|
||
In the following example, which utilizes the `actionsBlock` method, Slack will
|
||
send a `POST` request to your "Request URL" with a payload containing the
|
||
Slack user who clicked the button, the ID of the clicked button, and more.
|
||
Your application can then determine the action to take based on the payload.
|
||
You should also [verify the
|
||
request](https://api.slack.com/authentication/verifying-requests-from-slack)
|
||
was made by Slack:
|
||
|
||
|
||
|
||
1use Illuminate\Notifications\Slack\BlockKit\Blocks\ActionsBlock;
|
||
|
||
2use Illuminate\Notifications\Slack\BlockKit\Blocks\ContextBlock;
|
||
|
||
3use Illuminate\Notifications\Slack\BlockKit\Blocks\SectionBlock;
|
||
|
||
4use Illuminate\Notifications\Slack\SlackMessage;
|
||
|
||
5
|
||
|
||
6/**
|
||
|
||
7 * Get the Slack representation of the notification.
|
||
|
||
8 */
|
||
|
||
9public function toSlack(object $notifiable): SlackMessage
|
||
|
||
10{
|
||
|
||
11 return (new SlackMessage)
|
||
|
||
12 ->text('One of your invoices has been paid!')
|
||
|
||
13 ->headerBlock('Invoice Paid')
|
||
|
||
14 ->contextBlock(function (ContextBlock $block) {
|
||
|
||
15 $block->text('Customer #1234');
|
||
|
||
16 })
|
||
|
||
17 ->sectionBlock(function (SectionBlock $block) {
|
||
|
||
18 $block->text('An invoice has been paid.');
|
||
|
||
19 })
|
||
|
||
20 ->actionsBlock(function (ActionsBlock $block) {
|
||
|
||
21 // ID defaults to "button_acknowledge_invoice"...
|
||
|
||
22 $block->button('Acknowledge Invoice')->primary();
|
||
|
||
23
|
||
|
||
24 // Manually configure the ID...
|
||
|
||
25 $block->button('Deny')->danger()->id('deny_invoice');
|
||
|
||
26 });
|
||
|
||
27}
|
||
|
||
|
||
use Illuminate\Notifications\Slack\BlockKit\Blocks\ActionsBlock;
|
||
use Illuminate\Notifications\Slack\BlockKit\Blocks\ContextBlock;
|
||
use Illuminate\Notifications\Slack\BlockKit\Blocks\SectionBlock;
|
||
use Illuminate\Notifications\Slack\SlackMessage;
|
||
|
||
/**
|
||
* Get the Slack representation of the notification.
|
||
*/
|
||
public function toSlack(object $notifiable): SlackMessage
|
||
{
|
||
return (new SlackMessage)
|
||
->text('One of your invoices has been paid!')
|
||
->headerBlock('Invoice Paid')
|
||
->contextBlock(function (ContextBlock $block) {
|
||
$block->text('Customer #1234');
|
||
})
|
||
->sectionBlock(function (SectionBlock $block) {
|
||
$block->text('An invoice has been paid.');
|
||
})
|
||
->actionsBlock(function (ActionsBlock $block) {
|
||
// ID defaults to "button_acknowledge_invoice"...
|
||
$block->button('Acknowledge Invoice')->primary();
|
||
|
||
// Manually configure the ID...
|
||
$block->button('Deny')->danger()->id('deny_invoice');
|
||
});
|
||
}
|
||
|
||
#### Confirmation Modals
|
||
|
||
If you would like users to be required to confirm an action before it is
|
||
performed, you may invoke the `confirm` method when defining your button. The
|
||
`confirm` method accepts a message and a closure which receives a
|
||
`ConfirmObject` instance:
|
||
|
||
|
||
|
||
1use Illuminate\Notifications\Slack\BlockKit\Blocks\ActionsBlock;
|
||
|
||
2use Illuminate\Notifications\Slack\BlockKit\Blocks\ContextBlock;
|
||
|
||
3use Illuminate\Notifications\Slack\BlockKit\Blocks\SectionBlock;
|
||
|
||
4use Illuminate\Notifications\Slack\BlockKit\Composites\ConfirmObject;
|
||
|
||
5use Illuminate\Notifications\Slack\SlackMessage;
|
||
|
||
6
|
||
|
||
7/**
|
||
|
||
8 * Get the Slack representation of the notification.
|
||
|
||
9 */
|
||
|
||
10public function toSlack(object $notifiable): SlackMessage
|
||
|
||
11{
|
||
|
||
12 return (new SlackMessage)
|
||
|
||
13 ->text('One of your invoices has been paid!')
|
||
|
||
14 ->headerBlock('Invoice Paid')
|
||
|
||
15 ->contextBlock(function (ContextBlock $block) {
|
||
|
||
16 $block->text('Customer #1234');
|
||
|
||
17 })
|
||
|
||
18 ->sectionBlock(function (SectionBlock $block) {
|
||
|
||
19 $block->text('An invoice has been paid.');
|
||
|
||
20 })
|
||
|
||
21 ->actionsBlock(function (ActionsBlock $block) {
|
||
|
||
22 $block->button('Acknowledge Invoice')
|
||
|
||
23 ->primary()
|
||
|
||
24 ->confirm(
|
||
|
||
25 'Acknowledge the payment and send a thank you email?',
|
||
|
||
26 function (ConfirmObject $dialog) {
|
||
|
||
27 $dialog->confirm('Yes');
|
||
|
||
28 $dialog->deny('No');
|
||
|
||
29 }
|
||
|
||
30 );
|
||
|
||
31 });
|
||
|
||
32}
|
||
|
||
|
||
use Illuminate\Notifications\Slack\BlockKit\Blocks\ActionsBlock;
|
||
use Illuminate\Notifications\Slack\BlockKit\Blocks\ContextBlock;
|
||
use Illuminate\Notifications\Slack\BlockKit\Blocks\SectionBlock;
|
||
use Illuminate\Notifications\Slack\BlockKit\Composites\ConfirmObject;
|
||
use Illuminate\Notifications\Slack\SlackMessage;
|
||
|
||
/**
|
||
* Get the Slack representation of the notification.
|
||
*/
|
||
public function toSlack(object $notifiable): SlackMessage
|
||
{
|
||
return (new SlackMessage)
|
||
->text('One of your invoices has been paid!')
|
||
->headerBlock('Invoice Paid')
|
||
->contextBlock(function (ContextBlock $block) {
|
||
$block->text('Customer #1234');
|
||
})
|
||
->sectionBlock(function (SectionBlock $block) {
|
||
$block->text('An invoice has been paid.');
|
||
})
|
||
->actionsBlock(function (ActionsBlock $block) {
|
||
$block->button('Acknowledge Invoice')
|
||
->primary()
|
||
->confirm(
|
||
'Acknowledge the payment and send a thank you email?',
|
||
function (ConfirmObject $dialog) {
|
||
$dialog->confirm('Yes');
|
||
$dialog->deny('No');
|
||
}
|
||
);
|
||
});
|
||
}
|
||
|
||
#### Inspecting Slack Blocks
|
||
|
||
If you would like to quickly inspect the blocks you've been building, you can
|
||
invoke the `dd` method on the `SlackMessage` instance. The `dd` method will
|
||
generate and dump a URL to Slack's [Block Kit
|
||
Builder](https://app.slack.com/block-kit-builder/), which displays a preview
|
||
of the payload and notification in your browser. You may pass `true` to the
|
||
`dd` method to dump the raw payload:
|
||
|
||
|
||
|
||
1return (new SlackMessage)
|
||
|
||
2 ->text('One of your invoices has been paid!')
|
||
|
||
3 ->headerBlock('Invoice Paid')
|
||
|
||
4 ->dd();
|
||
|
||
|
||
return (new SlackMessage)
|
||
->text('One of your invoices has been paid!')
|
||
->headerBlock('Invoice Paid')
|
||
->dd();
|
||
|
||
### Routing Slack Notifications
|
||
|
||
To direct Slack notifications to the appropriate Slack team and channel,
|
||
define a `routeNotificationForSlack` method on your notifiable model. This
|
||
method can return one of three values:
|
||
|
||
* `null` \- which defers routing to the channel configured in the notification itself. You may use the `to` method when building your `SlackMessage` to configure the channel within the notification.
|
||
* A string specifying the Slack channel to send the notification to, e.g. `#support-channel`.
|
||
* A `SlackRoute` instance, which allows you to specify an OAuth token and channel name, e.g. `SlackRoute::make($this->slack_channel, $this->slack_token)`. This method should be used to send notifications to external workspaces.
|
||
|
||
For instance, returning `#support-channel` from the
|
||
`routeNotificationForSlack` method will send the notification to the
|
||
`#support-channel` channel in the workspace associated with the Bot User OAuth
|
||
token located in your application's `services.php` configuration file:
|
||
|
||
|
||
|
||
1<?php
|
||
|
||
2
|
||
|
||
3namespace App\Models;
|
||
|
||
4
|
||
|
||
5use Illuminate\Foundation\Auth\User as Authenticatable;
|
||
|
||
6use Illuminate\Notifications\Notifiable;
|
||
|
||
7use Illuminate\Notifications\Notification;
|
||
|
||
8
|
||
|
||
9class User extends Authenticatable
|
||
|
||
10{
|
||
|
||
11 use Notifiable;
|
||
|
||
12
|
||
|
||
13 /**
|
||
|
||
14 * Route notifications for the Slack channel.
|
||
|
||
15 */
|
||
|
||
16 public function routeNotificationForSlack(Notification $notification): mixed
|
||
|
||
17 {
|
||
|
||
18 return '#support-channel';
|
||
|
||
19 }
|
||
|
||
20}
|
||
|
||
|
||
<?php
|
||
|
||
namespace App\Models;
|
||
|
||
use Illuminate\Foundation\Auth\User as Authenticatable;
|
||
use Illuminate\Notifications\Notifiable;
|
||
use Illuminate\Notifications\Notification;
|
||
|
||
class User extends Authenticatable
|
||
{
|
||
use Notifiable;
|
||
|
||
/**
|
||
* Route notifications for the Slack channel.
|
||
*/
|
||
public function routeNotificationForSlack(Notification $notification): mixed
|
||
{
|
||
return '#support-channel';
|
||
}
|
||
}
|
||
|
||
### Notifying External Slack Workspaces
|
||
|
||
Before sending notifications to external Slack workspaces, your Slack App must
|
||
be distributed.
|
||
|
||
Of course, you will often want to send notifications to the Slack workspaces
|
||
owned by your application's users. To do so, you will first need to obtain a
|
||
Slack OAuth token for the user. Thankfully, [Laravel
|
||
Socialite](/docs/12.x/socialite) includes a Slack driver that will allow you
|
||
to easily authenticate your application's users with Slack and [obtain a bot
|
||
token](/docs/12.x/socialite#slack-bot-scopes).
|
||
|
||
Once you have obtained the bot token and stored it within your application's
|
||
database, you may utilize the `SlackRoute::make` method to route a
|
||
notification to the user's workspace. In addition, your application will
|
||
likely need to offer an opportunity for the user to specify which channel
|
||
notifications should be sent to:
|
||
|
||
|
||
|
||
1<?php
|
||
|
||
2
|
||
|
||
3namespace App\Models;
|
||
|
||
4
|
||
|
||
5use Illuminate\Foundation\Auth\User as Authenticatable;
|
||
|
||
6use Illuminate\Notifications\Notifiable;
|
||
|
||
7use Illuminate\Notifications\Notification;
|
||
|
||
8use Illuminate\Notifications\Slack\SlackRoute;
|
||
|
||
9
|
||
|
||
10class User extends Authenticatable
|
||
|
||
11{
|
||
|
||
12 use Notifiable;
|
||
|
||
13
|
||
|
||
14 /**
|
||
|
||
15 * Route notifications for the Slack channel.
|
||
|
||
16 */
|
||
|
||
17 public function routeNotificationForSlack(Notification $notification): mixed
|
||
|
||
18 {
|
||
|
||
19 return SlackRoute::make($this->slack_channel, $this->slack_token);
|
||
|
||
20 }
|
||
|
||
21}
|
||
|
||
|
||
<?php
|
||
|
||
namespace App\Models;
|
||
|
||
use Illuminate\Foundation\Auth\User as Authenticatable;
|
||
use Illuminate\Notifications\Notifiable;
|
||
use Illuminate\Notifications\Notification;
|
||
use Illuminate\Notifications\Slack\SlackRoute;
|
||
|
||
class User extends Authenticatable
|
||
{
|
||
use Notifiable;
|
||
|
||
/**
|
||
* Route notifications for the Slack channel.
|
||
*/
|
||
public function routeNotificationForSlack(Notification $notification): mixed
|
||
{
|
||
return SlackRoute::make($this->slack_channel, $this->slack_token);
|
||
}
|
||
}
|
||
|
||
## Localizing Notifications
|
||
|
||
Laravel allows you to send notifications in a locale other than the HTTP
|
||
request's current locale, and will even remember this locale if the
|
||
notification is queued.
|
||
|
||
To accomplish this, the `Illuminate\Notifications\Notification` class offers a
|
||
`locale` method to set the desired language. The application will change into
|
||
this locale when the notification is being evaluated and then revert back to
|
||
the previous locale when evaluation is complete:
|
||
|
||
|
||
|
||
1$user->notify((new InvoicePaid($invoice))->locale('es'));
|
||
|
||
|
||
$user->notify((new InvoicePaid($invoice))->locale('es'));
|
||
|
||
Localization of multiple notifiable entries may also be achieved via the
|
||
`Notification` facade:
|
||
|
||
|
||
|
||
1Notification::locale('es')->send(
|
||
|
||
2 $users, new InvoicePaid($invoice)
|
||
|
||
3);
|
||
|
||
|
||
Notification::locale('es')->send(
|
||
$users, new InvoicePaid($invoice)
|
||
);
|
||
|
||
#### User Preferred Locales
|
||
|
||
Sometimes, applications store each user's preferred locale. By implementing
|
||
the `HasLocalePreference` contract on your notifiable model, you may instruct
|
||
Laravel to use this stored locale when sending a notification:
|
||
|
||
|
||
|
||
1use Illuminate\Contracts\Translation\HasLocalePreference;
|
||
|
||
2
|
||
|
||
3class User extends Model implements HasLocalePreference
|
||
|
||
4{
|
||
|
||
5 /**
|
||
|
||
6 * Get the user's preferred locale.
|
||
|
||
7 */
|
||
|
||
8 public function preferredLocale(): string
|
||
|
||
9 {
|
||
|
||
10 return $this->locale;
|
||
|
||
11 }
|
||
|
||
12}
|
||
|
||
|
||
use Illuminate\Contracts\Translation\HasLocalePreference;
|
||
|
||
class User extends Model implements HasLocalePreference
|
||
{
|
||
/**
|
||
* Get the user's preferred locale.
|
||
*/
|
||
public function preferredLocale(): string
|
||
{
|
||
return $this->locale;
|
||
}
|
||
}
|
||
|
||
Once you have implemented the interface, Laravel will automatically use the
|
||
preferred locale when sending notifications and mailables to the model.
|
||
Therefore, there is no need to call the `locale` method when using this
|
||
interface:
|
||
|
||
|
||
|
||
1$user->notify(new InvoicePaid($invoice));
|
||
|
||
|
||
$user->notify(new InvoicePaid($invoice));
|
||
|
||
## Testing
|
||
|
||
You may use the `Notification` facade's `fake` method to prevent notifications
|
||
from being sent. Typically, sending notifications is unrelated to the code you
|
||
are actually testing. Most likely, it is sufficient to simply assert that
|
||
Laravel was instructed to send a given notification.
|
||
|
||
After calling the `Notification` facade's `fake` method, you may then assert
|
||
that notifications were instructed to be sent to users and even inspect the
|
||
data the notifications received:
|
||
|
||
Pest PHPUnit
|
||
|
||
|
||
|
||
1<?php
|
||
|
||
2
|
||
|
||
3use App\Notifications\OrderShipped;
|
||
|
||
4use Illuminate\Support\Facades\Notification;
|
||
|
||
5
|
||
|
||
6test('orders can be shipped', function () {
|
||
|
||
7 Notification::fake();
|
||
|
||
8
|
||
|
||
9 // Perform order shipping...
|
||
|
||
10
|
||
|
||
11 // Assert that no notifications were sent...
|
||
|
||
12 Notification::assertNothingSent();
|
||
|
||
13
|
||
|
||
14 // Assert a notification was sent to the given users...
|
||
|
||
15 Notification::assertSentTo(
|
||
|
||
16 [$user], OrderShipped::class
|
||
|
||
17 );
|
||
|
||
18
|
||
|
||
19 // Assert a notification was not sent...
|
||
|
||
20 Notification::assertNotSentTo(
|
||
|
||
21 [$user], AnotherNotification::class
|
||
|
||
22 );
|
||
|
||
23
|
||
|
||
24 // Assert a notification was sent twice...
|
||
|
||
25 Notification::assertSentTimes(WeeklyReminder::class, 2);
|
||
|
||
26
|
||
|
||
27 // Assert that a given number of notifications were sent...
|
||
|
||
28 Notification::assertCount(3);
|
||
|
||
29});
|
||
|
||
|
||
<?php
|
||
|
||
use App\Notifications\OrderShipped;
|
||
use Illuminate\Support\Facades\Notification;
|
||
|
||
test('orders can be shipped', function () {
|
||
Notification::fake();
|
||
|
||
// Perform order shipping...
|
||
|
||
// Assert that no notifications were sent...
|
||
Notification::assertNothingSent();
|
||
|
||
// Assert a notification was sent to the given users...
|
||
Notification::assertSentTo(
|
||
[$user], OrderShipped::class
|
||
);
|
||
|
||
// Assert a notification was not sent...
|
||
Notification::assertNotSentTo(
|
||
[$user], AnotherNotification::class
|
||
);
|
||
|
||
// Assert a notification was sent twice...
|
||
Notification::assertSentTimes(WeeklyReminder::class, 2);
|
||
|
||
// Assert that a given number of notifications were sent...
|
||
Notification::assertCount(3);
|
||
});
|
||
|
||
|
||
1<?php
|
||
|
||
2
|
||
|
||
3namespace Tests\Feature;
|
||
|
||
4
|
||
|
||
5use App\Notifications\OrderShipped;
|
||
|
||
6use Illuminate\Support\Facades\Notification;
|
||
|
||
7use Tests\TestCase;
|
||
|
||
8
|
||
|
||
9class ExampleTest extends TestCase
|
||
|
||
10{
|
||
|
||
11 public function test_orders_can_be_shipped(): void
|
||
|
||
12 {
|
||
|
||
13 Notification::fake();
|
||
|
||
14
|
||
|
||
15 // Perform order shipping...
|
||
|
||
16
|
||
|
||
17 // Assert that no notifications were sent...
|
||
|
||
18 Notification::assertNothingSent();
|
||
|
||
19
|
||
|
||
20 // Assert a notification was sent to the given users...
|
||
|
||
21 Notification::assertSentTo(
|
||
|
||
22 [$user], OrderShipped::class
|
||
|
||
23 );
|
||
|
||
24
|
||
|
||
25 // Assert a notification was not sent...
|
||
|
||
26 Notification::assertNotSentTo(
|
||
|
||
27 [$user], AnotherNotification::class
|
||
|
||
28 );
|
||
|
||
29
|
||
|
||
30 // Assert a notification was sent twice...
|
||
|
||
31 Notification::assertSentTimes(WeeklyReminder::class, 2);
|
||
|
||
32
|
||
|
||
33 // Assert that a given number of notifications were sent...
|
||
|
||
34 Notification::assertCount(3);
|
||
|
||
35 }
|
||
|
||
36}
|
||
|
||
|
||
<?php
|
||
|
||
namespace Tests\Feature;
|
||
|
||
use App\Notifications\OrderShipped;
|
||
use Illuminate\Support\Facades\Notification;
|
||
use Tests\TestCase;
|
||
|
||
class ExampleTest extends TestCase
|
||
{
|
||
public function test_orders_can_be_shipped(): void
|
||
{
|
||
Notification::fake();
|
||
|
||
// Perform order shipping...
|
||
|
||
// Assert that no notifications were sent...
|
||
Notification::assertNothingSent();
|
||
|
||
// Assert a notification was sent to the given users...
|
||
Notification::assertSentTo(
|
||
[$user], OrderShipped::class
|
||
);
|
||
|
||
// Assert a notification was not sent...
|
||
Notification::assertNotSentTo(
|
||
[$user], AnotherNotification::class
|
||
);
|
||
|
||
// Assert a notification was sent twice...
|
||
Notification::assertSentTimes(WeeklyReminder::class, 2);
|
||
|
||
// Assert that a given number of notifications were sent...
|
||
Notification::assertCount(3);
|
||
}
|
||
}
|
||
|
||
You may pass a closure to the `assertSentTo` or `assertNotSentTo` methods in
|
||
order to assert that a notification was sent that passes a given "truth test".
|
||
If at least one notification was sent that passes the given truth test then
|
||
the assertion will be successful:
|
||
|
||
|
||
|
||
1Notification::assertSentTo(
|
||
|
||
2 $user,
|
||
|
||
3 function (OrderShipped $notification, array $channels) use ($order) {
|
||
|
||
4 return $notification->order->id === $order->id;
|
||
|
||
5 }
|
||
|
||
6);
|
||
|
||
|
||
Notification::assertSentTo(
|
||
$user,
|
||
function (OrderShipped $notification, array $channels) use ($order) {
|
||
return $notification->order->id === $order->id;
|
||
}
|
||
);
|
||
|
||
#### On-Demand Notifications
|
||
|
||
If the code you are testing sends on-demand notifications, you can test that
|
||
the on-demand notification was sent via the `assertSentOnDemand` method:
|
||
|
||
|
||
|
||
1Notification::assertSentOnDemand(OrderShipped::class);
|
||
|
||
|
||
Notification::assertSentOnDemand(OrderShipped::class);
|
||
|
||
By passing a closure as the second argument to the `assertSentOnDemand`
|
||
method, you may determine if an on-demand notification was sent to the correct
|
||
"route" address:
|
||
|
||
|
||
|
||
1Notification::assertSentOnDemand(
|
||
|
||
2 OrderShipped::class,
|
||
|
||
3 function (OrderShipped $notification, array $channels, object $notifiable) use ($user) {
|
||
|
||
4 return $notifiable->routes['mail'] === $user->email;
|
||
|
||
5 }
|
||
|
||
6);
|
||
|
||
|
||
Notification::assertSentOnDemand(
|
||
OrderShipped::class,
|
||
function (OrderShipped $notification, array $channels, object $notifiable) use ($user) {
|
||
return $notifiable->routes['mail'] === $user->email;
|
||
}
|
||
);
|
||
|
||
## Notification Events
|
||
|
||
#### Notification Sending Event
|
||
|
||
When a notification is sending, the
|
||
`Illuminate\Notifications\Events\NotificationSending` event is dispatched by
|
||
the notification system. This contains the "notifiable" entity and the
|
||
notification instance itself. You may create [event
|
||
listeners](/docs/12.x/events) for this event within your application:
|
||
|
||
|
||
|
||
1use Illuminate\Notifications\Events\NotificationSending;
|
||
|
||
2
|
||
|
||
3class CheckNotificationStatus
|
||
|
||
4{
|
||
|
||
5 /**
|
||
|
||
6 * Handle the event.
|
||
|
||
7 */
|
||
|
||
8 public function handle(NotificationSending $event): void
|
||
|
||
9 {
|
||
|
||
10 // ...
|
||
|
||
11 }
|
||
|
||
12}
|
||
|
||
|
||
use Illuminate\Notifications\Events\NotificationSending;
|
||
|
||
class CheckNotificationStatus
|
||
{
|
||
/**
|
||
* Handle the event.
|
||
*/
|
||
public function handle(NotificationSending $event): void
|
||
{
|
||
// ...
|
||
}
|
||
}
|
||
|
||
The notification will not be sent if an event listener for the
|
||
`NotificationSending` event returns `false` from its `handle` method:
|
||
|
||
|
||
|
||
1/**
|
||
|
||
2 * Handle the event.
|
||
|
||
3 */
|
||
|
||
4public function handle(NotificationSending $event): bool
|
||
|
||
5{
|
||
|
||
6 return false;
|
||
|
||
7}
|
||
|
||
|
||
/**
|
||
* Handle the event.
|
||
*/
|
||
public function handle(NotificationSending $event): bool
|
||
{
|
||
return false;
|
||
}
|
||
|
||
Within an event listener, you may access the `notifiable`, `notification`, and
|
||
`channel` properties on the event to learn more about the notification
|
||
recipient or the notification itself:
|
||
|
||
|
||
|
||
1/**
|
||
|
||
2 * Handle the event.
|
||
|
||
3 */
|
||
|
||
4public function handle(NotificationSending $event): void
|
||
|
||
5{
|
||
|
||
6 // $event->channel
|
||
|
||
7 // $event->notifiable
|
||
|
||
8 // $event->notification
|
||
|
||
9}
|
||
|
||
|
||
/**
|
||
* Handle the event.
|
||
*/
|
||
public function handle(NotificationSending $event): void
|
||
{
|
||
// $event->channel
|
||
// $event->notifiable
|
||
// $event->notification
|
||
}
|
||
|
||
#### Notification Sent Event
|
||
|
||
When a notification is sent, the
|
||
`Illuminate\Notifications\Events\NotificationSent` [event](/docs/12.x/events)
|
||
is dispatched by the notification system. This contains the "notifiable"
|
||
entity and the notification instance itself. You may create [event
|
||
listeners](/docs/12.x/events) for this event within your application:
|
||
|
||
|
||
|
||
1use Illuminate\Notifications\Events\NotificationSent;
|
||
|
||
2
|
||
|
||
3class LogNotification
|
||
|
||
4{
|
||
|
||
5 /**
|
||
|
||
6 * Handle the event.
|
||
|
||
7 */
|
||
|
||
8 public function handle(NotificationSent $event): void
|
||
|
||
9 {
|
||
|
||
10 // ...
|
||
|
||
11 }
|
||
|
||
12}
|
||
|
||
|
||
use Illuminate\Notifications\Events\NotificationSent;
|
||
|
||
class LogNotification
|
||
{
|
||
/**
|
||
* Handle the event.
|
||
*/
|
||
public function handle(NotificationSent $event): void
|
||
{
|
||
// ...
|
||
}
|
||
}
|
||
|
||
Within an event listener, you may access the `notifiable`, `notification`,
|
||
`channel`, and `response` properties on the event to learn more about the
|
||
notification recipient or the notification itself:
|
||
|
||
|
||
|
||
1/**
|
||
|
||
2 * Handle the event.
|
||
|
||
3 */
|
||
|
||
4public function handle(NotificationSent $event): void
|
||
|
||
5{
|
||
|
||
6 // $event->channel
|
||
|
||
7 // $event->notifiable
|
||
|
||
8 // $event->notification
|
||
|
||
9 // $event->response
|
||
|
||
10}
|
||
|
||
|
||
/**
|
||
* Handle the event.
|
||
*/
|
||
public function handle(NotificationSent $event): void
|
||
{
|
||
// $event->channel
|
||
// $event->notifiable
|
||
// $event->notification
|
||
// $event->response
|
||
}
|
||
|
||
## Custom Channels
|
||
|
||
Laravel ships with a handful of notification channels, but you may want to
|
||
write your own drivers to deliver notifications via other channels. Laravel
|
||
makes it simple. To get started, define a class that contains a `send` method.
|
||
The method should receive two arguments: a `$notifiable` and a
|
||
`$notification`.
|
||
|
||
Within the `send` method, you may call methods on the notification to retrieve
|
||
a message object understood by your channel and then send the notification to
|
||
the `$notifiable` instance however you wish:
|
||
|
||
|
||
|
||
1<?php
|
||
|
||
2
|
||
|
||
3namespace App\Notifications;
|
||
|
||
4
|
||
|
||
5use Illuminate\Notifications\Notification;
|
||
|
||
6
|
||
|
||
7class VoiceChannel
|
||
|
||
8{
|
||
|
||
9 /**
|
||
|
||
10 * Send the given notification.
|
||
|
||
11 */
|
||
|
||
12 public function send(object $notifiable, Notification $notification): void
|
||
|
||
13 {
|
||
|
||
14 $message = $notification->toVoice($notifiable);
|
||
|
||
15
|
||
|
||
16 // Send notification to the $notifiable instance...
|
||
|
||
17 }
|
||
|
||
18}
|
||
|
||
|
||
<?php
|
||
|
||
namespace App\Notifications;
|
||
|
||
use Illuminate\Notifications\Notification;
|
||
|
||
class VoiceChannel
|
||
{
|
||
/**
|
||
* Send the given notification.
|
||
*/
|
||
public function send(object $notifiable, Notification $notification): void
|
||
{
|
||
$message = $notification->toVoice($notifiable);
|
||
|
||
// Send notification to the $notifiable instance...
|
||
}
|
||
}
|
||
|
||
Once your notification channel class has been defined, you may return the
|
||
class name from the `via` method of any of your notifications. In this
|
||
example, the `toVoice` method of your notification can return whatever object
|
||
you choose to represent voice messages. For example, you might define your own
|
||
`VoiceMessage` class to represent these messages:
|
||
|
||
|
||
|
||
1<?php
|
||
|
||
2
|
||
|
||
3namespace App\Notifications;
|
||
|
||
4
|
||
|
||
5use App\Notifications\Messages\VoiceMessage;
|
||
|
||
6use App\Notifications\VoiceChannel;
|
||
|
||
7use Illuminate\Bus\Queueable;
|
||
|
||
8use Illuminate\Contracts\Queue\ShouldQueue;
|
||
|
||
9use Illuminate\Notifications\Notification;
|
||
|
||
10
|
||
|
||
11class InvoicePaid extends Notification
|
||
|
||
12{
|
||
|
||
13 use Queueable;
|
||
|
||
14
|
||
|
||
15 /**
|
||
|
||
16 * Get the notification channels.
|
||
|
||
17 */
|
||
|
||
18 public function via(object $notifiable): string
|
||
|
||
19 {
|
||
|
||
20 return VoiceChannel::class;
|
||
|
||
21 }
|
||
|
||
22
|
||
|
||
23 /**
|
||
|
||
24 * Get the voice representation of the notification.
|
||
|
||
25 */
|
||
|
||
26 public function toVoice(object $notifiable): VoiceMessage
|
||
|
||
27 {
|
||
|
||
28 // ...
|
||
|
||
29 }
|
||
|
||
30}
|
||
|
||
|
||
<?php
|
||
|
||
namespace App\Notifications;
|
||
|
||
use App\Notifications\Messages\VoiceMessage;
|
||
use App\Notifications\VoiceChannel;
|
||
use Illuminate\Bus\Queueable;
|
||
use Illuminate\Contracts\Queue\ShouldQueue;
|
||
use Illuminate\Notifications\Notification;
|
||
|
||
class InvoicePaid extends Notification
|
||
{
|
||
use Queueable;
|
||
|
||
/**
|
||
* Get the notification channels.
|
||
*/
|
||
public function via(object $notifiable): string
|
||
{
|
||
return VoiceChannel::class;
|
||
}
|
||
|
||
/**
|
||
* Get the voice representation of the notification.
|
||
*/
|
||
public function toVoice(object $notifiable): VoiceMessage
|
||
{
|
||
// ...
|
||
}
|
||
}
|
||
|